From The CRPG Addict
 |
| The game almost immediately reveals its title to be a double-entendre. |
Treasures of the Savage Frontier
United States
Beyond (developer), Strategic Simulations, Inc. (publisher)
Released 1992 for Amiga and DOS
Released 1992 for Amiga and DOS
Date Started: 20 July 2019
Settling into a Gold Box game is like going back to your home town after a few years. You enjoy looking for the little changes while at the same time hoping that not much has changed. The town still has its same friendly character, you think, and it looks like all the neighborhoods are still 16 x 16. The old Irish pub seems to have gotten a VGA facelift; maybe I’ll get to know the NPCs there a little better this trip. Mr. Miller at the armory is still hawking that weird selection of polearms, but he’s got helmets now, too. Oh, looks like MacGregor’s pharmacy got bought out by a Rite Aid–and I hear they have a new “Repair” command that automatically heals all your ailments. Yes, maybe some of those things changed on your last trip. It’s hard to remember. Does it really matter?
Of course, your hometown is always happy to welcome you with all the experience and stuff that you’ve accumulated since you were first created here. Well–most of it. They haven’t legalized weed or Gauntlets of Dexterity yet, so you’ll have to leave those where you came from.
 |
| The import process confiscates a few items. |
We don’t have many trips to the old neighborhood left. Mom and dad sold the place for a better house in a town called Dark Sun, if you can imagine. They’re hardly ever even home. They’ve been leasing it short-term to some executives from a company called Beyond. Better enjoy these streets–and killing bandits on them via one of the best combat engines you’ve ever experienced–while you can.
I’ve been plucking games from the 1992 list at random, but I’m not sure if I wouldn’t have done it in this order deliberately. Of the three remaining Gold Box games, I think I’ll enjoy The Dark Queen of Krynn the most, Buck Rogers: Matrix Cubed the least, and Treasures somewhere in between. If that’s true, Treasures is a good one to ease into for the first time in almost three years–saving the best experience for last, but not ruining our homecoming on the worst part of town.
I like the setup here. It requires some knowledge of the previous game and the Forgotten Realms factions, but it isn’t overly complicated. In Gateway to the Savage Frontier, the characters were former caravan guards who slowly stumbled on a conspiracy by Zhentarim (the evil mercenary company that rules Zhentil Keep) to take over the Savage Frontier (a long strip of land east of the Sword Coast) by marching an army across the Anauroch Desert (which lies between Zhentil Keep and the Savage Frontier) to the city of Ascore. The party foiled the plan by activating a magic ritual in Ascore that summoned various desert monsters to destroy the invading hordes.
 |
| The game map shows that action will take place on the western side of the Savage Frontier, plus the Sword Coast cities. If it stretched just a little further south, we’d see Baldur’s Gate. |
Treasures begins a few weeks later, with the party enjoying a picnic in the hills above Yartar. Suddenly, we’re sucked through a portal, arriving on the cold stone floor of a dwarven stronghold in the city of Llorkh. The agent of our transportation is Amanitas, the setting’s version of Gandalf or Elminster, an absent-minded wizard who aids and directs the party.
 |
| Why is this spell never available to me no matter what level I achieve? |
Amanitas relates that after their defeat, the shattered remains of the Zhentarim fled south to Llorkh, the only city in the region that they still controlled. But when the dwarven residents of Llorkh heard that the Zhentarim had been defeated, they realized this was their prime chance to revolt. The city has been plunged into chaos, with the dwarves against the Zhent garrison and the returning survivors of Ascore. Amanitas hopes that we’ll do our usual thing. Of course, he won’t be sticking around himself. He’s going to return home to Secomber to investigate “troubling reports about strange new events in the Savage Frontier.” One hopes this includes the apparent imposition of slavery on former caravan guards.
I took a quick look at character creation to make sure nothing had changed (I didn’t see anything) before importing my Gateway party, which consists of:
- Broadside, a lawful good human male paladin of Level 7
- Talldark, a chaotic good human female ranger of Level 7
- Ghost, a neutral good dwarf male fighter/thief of Levels 5/6
- Alpha, a lawful good human male cleric of Level 6
- Eso, a chaotic good human female cleric of Level 6
- Monitor, a neutral good elf magic-user of Level 6
Ghost will cap at Level 9 as a fighter, two levels below the maximum for the game, but I guess I’ll live with it. Monitor can go to Level 11 as a mage, which also happens to be the game maximum. If the series had gone on for one more title, you’d have to go with an all-human party, or suffer from very low level caps, as in the Forgotten Realms series.
 |
| A new character is pretty pathetic compared to an imported one. |
Most of their equipment came with them, save the Gauntlets of Dexterity, some magic scrolls, ioun stones, a Wand of Defoliation, and a long sword +2 versus undead. Still, everyone has magic weapons and armor. An imported party has an enormous advantage over one created for the game. New characters start at around Level 4 with only 22,600 experience (my imported characters had between 80,000 and 140,0000) and non-magic items. My imported party also has, I suspect, enough money in gems and jewelry to last the entire game.
The game begins in war-torn Llorkh, where the ultimate goal is to assault the Zhent keep in the east-center of the city. An early journal entry recommends that, before heading there, you “clear the rest of the town,” thus weakening the Zhent forces and stopping them from sending reinforcements. Yes, we’re still using paper journals. I don’t really know why.
 |
| Getting a journal reference . . . |
 |
| . . . and marking it off in the paper (or PDF) journal. |
Llorkh held to the 16 x 16 standard that the Gold Box has used since Pool of Radiance, with another 8 x 16 for the keep. I normally like mapping, but for whatever reason, I didn’t map during this session. I relied on the overhead “Area” map to get around and make sure I covered every square, which isn’t terribly hard on a map this small. The “Area” map still doesn’t distinguish walls from doors, which is something that I wish the series had fixed before the end.
 |
| I did most of my exploration from this map rather than mapping myself. |
The town had a weapons shop, a couple of inns, a temple, and a training hall, all open during the strife. All my characters except Broadside gained one or two levels during the session. I think I’ll probably dual either Alpha or Eso to a second mage pretty soon. The only things I bothered to purchase were arrows and darts, and I noticed that (perhaps for the first time) they now automatically stack, meaning you don’t have to buy darts 4 at a time until your mage’s inventory is full, then stack them, then buy more.
 |
| Part of the options in the armory. |
The Zhent forces in the keep include “lordsmen” (high-level fighters), driders, gryphons, ettins, efreet, and hill giants. Driders were probably the toughest enemies. If you don’t damage them, they cast “Fireshield” in the first round, which does double the damage back to the attacker for every melee attack. Once the spell is cast, you have to try to destroy the Drider with spells (“Magic Missile” is a favorite, though they shrug off spell damage about 50% of the time) or ranged weapons.
There were around 20 fixed encounters on the Llorkh map. The accumulation of combats was a bit harder than I remember in any previous Gold Box game, and I found myself really working my various spells, even going so far as to cast “Prayer” and “Bless” in combat, which is something I hardly ever do. My wizard only had two Level 3 spells at the game’s outset. Predictably, I used them for “Lightning Bolt” and “Fireball,” but these went fast. I got a lot of use out of the clerics’ “Hold Person.” Fortunately, the game is a bit too generous on letting you rest, heal, and re-memorize spells just about anywhere. Incidentally, unlike Gateway, “Fix” no longer re-memorizes spells. It just heals.
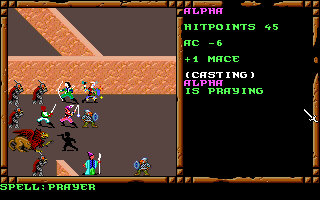 |
| It’s rare for me to cast “Prayer” in combat. I usually use it as a buffing spell. |
One thing that has changed: both enemies and allies can join the battle even after it’s been going on for a few rounds. You suddenly get a message that “dwarf fighter has joined the combat” or “Zhent fighter has joined the combat,” with the new characters taking positions near where the party started. So far, every ally joining has been balanced by an enemy and vice versa. Sometimes you can control the NPC allies (I think this is based on a charisma roll for the leader), but other times they control themselves. Either way, they’re usually more trouble than they’re worth, appearing in the back and not having much room to maneuver around the main party. Plus, if the NPCs are controlling themselves, the pathfinding remains awful and they get hung up on every wall.
 |
| The NPC dwarves don’t really contribute much to combat. |
There weren’t a lot of role-playing encounters in the opening map. There were a few places where I had options to help a group of dwarves or leave, which isn’t exactly much of a choice. When I reached the front gates of the city in my explorations, the game asked if I wanted to stay and fight or leave the dwarves to their fate. On a lark, I tried to leave, but the dwarves just barred the gate and forced me to stay anyway.
 |
| This isn’t much of a choice. I have to defeat everyone anyway. |
The one major exception was an encounter in a building where I came across some wounded Zhents and a companion treating them. I had options to attack or leave them alone. I decided to adhere to the Geneva Convention, at which point one of the Zhents gave me some intelligence that the Zhent lord Geildarr was planning to ambush the dwarven leaders while they slept. I don’t think this ended up doing anything for me, but it was still an interesting encounter.
 |
| On one hand, the Zhentarim are unrepentantly evil. On the other hand, we shouldn’t stoop to their level. |
While few of the other encounters offered any role-playing options, there were a lot of contextual encounters (defined here). You rarely just run into a pack of enemies looking for blood, the way you do in, say, The Bard’s Tale or Might and Magic. Instead, you get some message indicating why the combat is occurring before it occurs. The series has generally done a good job with these, but I think Treasures is offering more pre-combat messages than any prior game. Some examples:
- We burst into a room and interrupt a group of ettins and fighters dressing for battle.
- We hear a lovely melodic voice coming from behind a door, enter, and find ourselves in combat with three harpies. I can’t remember harpies making an appearance in Gold Box games before.
- A building turns out to house a group of Bane worshippers, who attack immediately.
- We interrupt a group of hill giants and fighters playing dice.
 |
| This is so much better than just going right into combat. |
It’s been quite a while since I had a combat system that I really enjoyed. I think Crusaders of the Dark Savant was probably the last. Here, I immediately remembered everything I love about the Gold Box approach to combat: when enemies line up to create a perfect “Lightning Bolt” scenario, or attack in a big cluster ideal for a “Fireball”; when a backstab connects; when my paladin is able to kill two enemies with his two attacks per round; when all three castings of “Hold Person” take effect and you can kill the paralyzed enemies at your leisure; when your casting of “Stinking Cloud” reorganizes the battlefield the way you want it. And every new spell slot increases your tactical options. Not only has this system not been improved upon in a turn-based game, I’m not even sure how you’d improve it. It’s one of the few completely transparent systems in all of RPG-dom, meaning that whether an attack succeeds or fails, whether a spell takes effect or doesn’t, whether you live or die, you always understand exactly what’s happening and why it’s happening.
 |
| Monsters arranged perfectly for a “Fireball.” |
The opening session culminated with an attack on Lord Geildarr’s keep, a fortress that had once belonged to a dwarven king named Redblade. There was a very large battle with fighters and ettins in the entry hall.
Geildarr himself seemed to appear in a southern room, but it turned out to be only an illusion. After we tried to attack him, we were attacked ourselves by driders and efreet. In a northern room, a brunette sorceress similarly disappeared, leaving us to fight her minions.
 |
| Tricky, tricky. |
Continuing down into the basement, we fought more guards as well as several groups of carrion crawlers (which can paralyze) in the old jail cells. At the north end of the cellars, I found a fighter giving a speech to his troops, and it ominously ended with, “Even if we don’t hold Llorkh, the plan to divide–.” So apparently the Zhents have a bigger plan.
Next, we came to a room where a beautiful blonde fighter was fighting with a “beautiful” brunette sorceress. At least, that’s how the game describes her.
 |
| You decide. |
They got into a brawl, and during the tussle, the sorceress changed her appearance to match the fighter, both then shouting that she was the “real” blonde. I had various options at this point, and it turned out that casting “Dispel” allowed me to separate them again. It feels like the paladin’s innate “Detect Evil” abilities should have helped here, but I didn’t have that option. Maybe he didn’t have that ability in the first edition of AD&D rules.
A battle with the sorceress (Cortarra) and her allies–several fighters and cockatrices–ensued. I concentrated on killing the cockatrices first, since they can stone with a successful melee attack. When it was over, the fighter–Siulajia–offered to join the party. Of course, I accepted. She related that she’s the daughter of a ranger from the High Forest, captured by retreating Zhent forces and brought to Lord Geildarr as a “gift.” It’s always useful to have a pure fighter. She seems to do well with a bow.
 |
| Given that she’s also the character on the title screen, I assume she later becomes more important. |
The final battle was a two-part affair that began when I stumbled into a room and found Lord Geildarr threatening a warrior named Jarbarkas. Geildarr turned on me and first had a giant skeleton and a group of humans attack, including two “Hosttower mages” and two “Kraken masters,” showing that the Zhents are allied with the Host Tower of the Arcane in Luskan and the Kraken Society of Purple Rocks. I suspect my adventures may take me in those directions next.
 |
| It’s always great when this spell works. |
Once I defeated the initial group, Geildarr himself attacked with numerous “lordsmen.” He was probably a high-level magic-user, but he had only a small number of hit points, and he went down after one “Magic Missile” from Monitor and a couple of arrows from Siulajia. “Hold Person” helped mop up the rest.
 |
| The Zhents have allied with Gargamel. |
After the battle, Jarbarkas gave us a reasonably long account of his history: He’s from a village called Windycliffs on the Sword Coast. The town was recently sacked by Luskans, and Jarbarkas set out to get revenge, ultimately getting himself captured. He recommended that we search enemies for “any kind of crystal.” “I know not what the powers of these crystals may be,” he said, “but they were very careful to shatter them rather than let the stones fall into our hands. There are three different colors, and no single person is ever entrusted with more than one.”
 |
| Technically, I’ve already won the game. It just lets you keep playing and exploring new areas after you win. |
I expected Jarbarkas to offer to join us, but he took off after this bit of intelligence. Amidst the cheering of the victorious dwarves, we identified our looted equipment, leveled up, memorized new spells, and contemplated our next move, which seemed to be to visit Amanitas in Secomber.
 |
| I guess it’s for the best. Your name is a bit too similar to someone we all hate. |
You can leave Llorkh via the gate (on foot) or by renting a boat to go along the river system. Either way, leaving puts you on the overland map. Aside from slightly better graphics than previous overland maps, this one seems (for the first time that I remember) to have some consideration of weather. At least, it’s constantly telling you about changes in weather conditions. I’m not sure what impact these conditions have on the game.
 |
| Overland exploration by river. |
I faced no resistance on the way down river (I think this is one of the advantages to getting a boat). On the river, it’s impossible to avoid the city of Loudwater on the way to Secomber, so I figured I might as well explore it while we were here. The southern part of the city has the usual shops and services, but we soon encountered a building with a bunch of Kraken Society spies. After we defeated them in combat, we found a map showing a line along a road between the Way Inn, Daggerford, and Waterdeep. “We must break their supply lines,” a note read. “Attack and take Daggerford and the Way Inn now! BEFORE they arrive!”
 |
| The Kraken Society note. |
A way up the road, a young woman asked me to help find her lost mother, then led me into a building in which she and her “sisters” turned into something called “greenhags” and attacked. I’ve never encountered this monster before. Their icons look like wights, but they’re clearly not undead. In the middle of combat, they “changed form” into two mages and a dwarven fighter. They changed back and forth several times during the battle–I’m not sure what it did for them–but I eventually cut them all down and got a magic ring.
 |
| What in the world are these things? |
Actual undead are to be found in a graveyard east of town–ghouls and wights. They’re fairly easy to turn at my level. I found no treasure or anything among them.
 |
| An atmospheric message as I enter the undead part of town. |
The northern part of Loudwater had an “adventure supplies” shop that sold flasks of oil, mirrors, robes, cloaks, boots, and belts. I bought everyone boots, just because, but I’m not sure if any of these items really has any use. They haven’t in most past games.
Finally, while exploring a back alley in the northeast part of the city, I suffered not only my first character death but also my first full-party death. I was lured into a building by the singing of another group of harpies. This time, they actually hit me, which causes the struck character to be “Charmed.” They charmed my strongest fighter and one cleric in the first round. I tried to have the second cleric cast “Dispel,” but it didn’t work. During the second round, the charmed cleric cast “Hold Person” and held three of the remaining party members, who were soon cut down by my charmed paladin. With no one left conscious about to cast “Dispel,” all I could do was focus on the harpies, passing the rounds and hoping that the charmed condition would wear off. I was able to kill the harpies with mage spells, but in the subsequent rounds the charmed characters killed everyone. The party was destroyed, but just as in Gateway, the monsters no longer rejoice.
All told, a satisfying start to a familiar setting. I look forward to playing more.
Time so far: 4 hours
Original URL: http://crpgaddict.blogspot.com/2019/07/game-337-treasures-of-savage-frontier.html