From Blogging Games
Guild of Dungeoneering is one of those relatively simple, but also relatively fun to play indie RPG/Card Games. It has good style, good humor and good mechanics. I got it in a humble bundle sale before they apparently sold out (just playing, don’t really have an opinion about the recent news), so I don’t feel guilty about enjoying it.
Instead of writing random and uninteresting thoughts about the game, I’ll go with my usual screenshot play-through of a quest, which is the equivalent of a level in the game.
As early as in the main menu, it’s clear that Guild of Dungeoneering has style. There isn’t much to say about that.
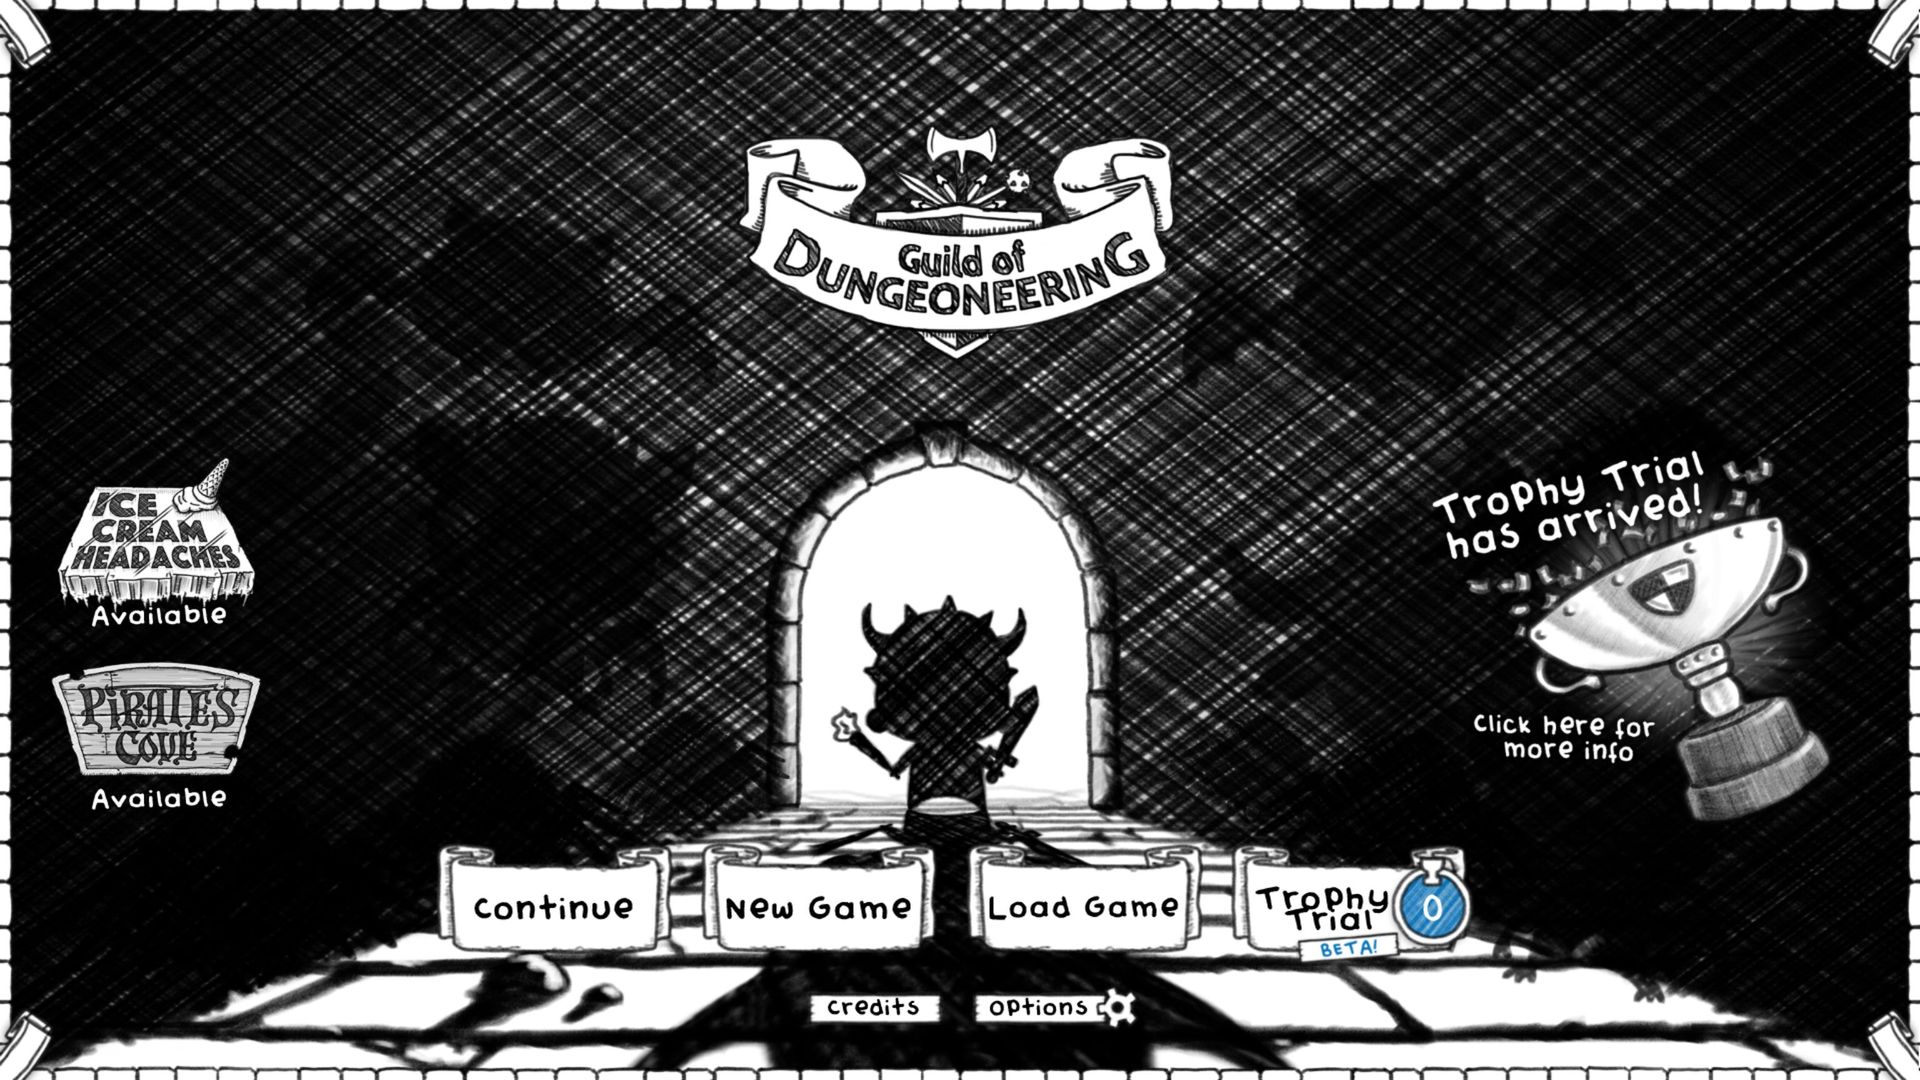
Pictured: The Main Menu in Guild of Dungeoneers
Another thing Guild of Dungeoneering has is a tutorial, so we’re hitting continue here and playing a quest from what I’m guessing is about half-way through the game.
Once the save is loaded, we’re presented with a semi-animated top-down view of our guild, with nice and relaxing background music playing.

Pictured: The Guild View
Each of those squares is a room we’ve built using hard cash earned in quests. If i remember correctly, you start the game with just the middle section, followed by immediately building the first room as part of the tutorial.
The rooms with burtonesque characters on them are rooms which unlocked that specific character class. I have 3 more to unlock that I know off.
Hitting Dungeoneers takes us to the list of all those characters you see on the main view.
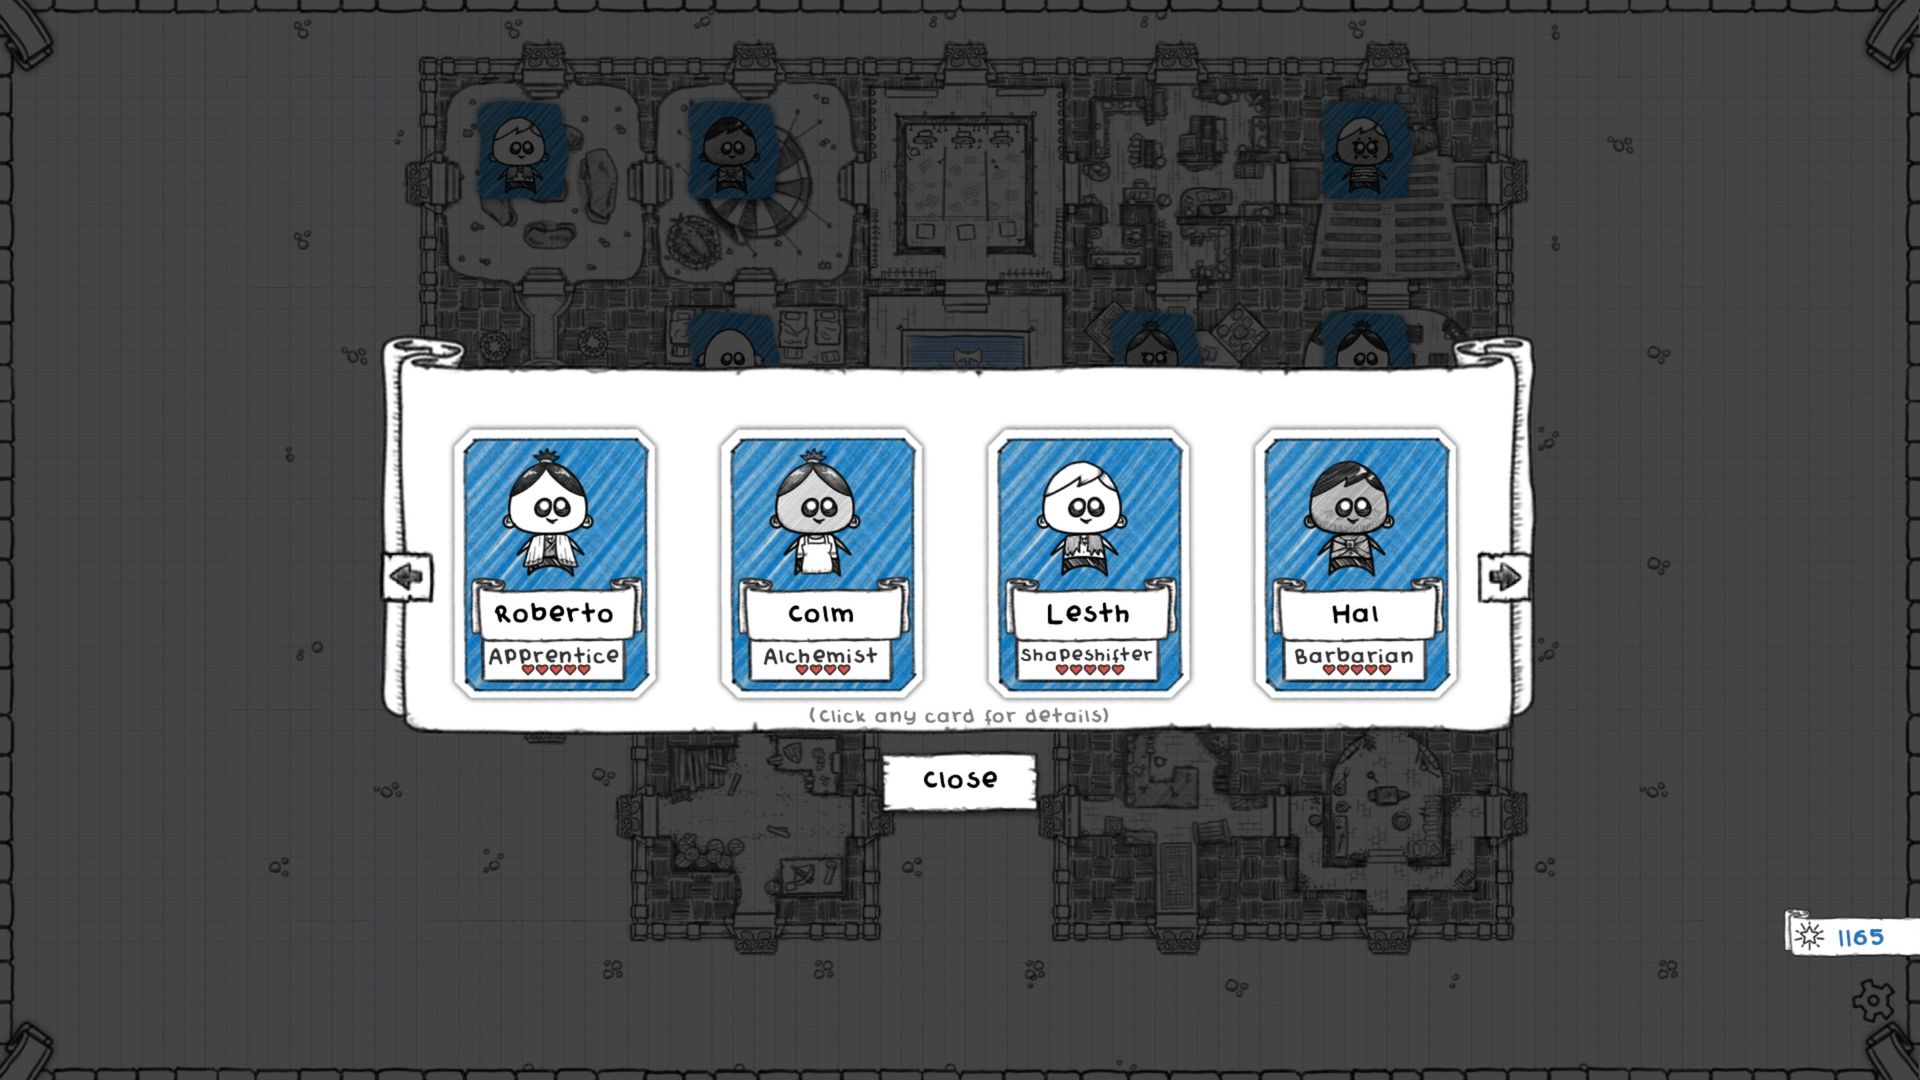
Pictured: The list of living dungeoneers
Really, this is not a great view, since you only get to see four people at a time. However, clicking on each dungeoneer here is the only way to see check their stats. Come to think of it, it would make sense for the icons on the main guild view to open these details as well, but instead, clicking on a dungeoneer on that view simply makes them say something funny.
Anyway, let us take a quick look at our barbarian.
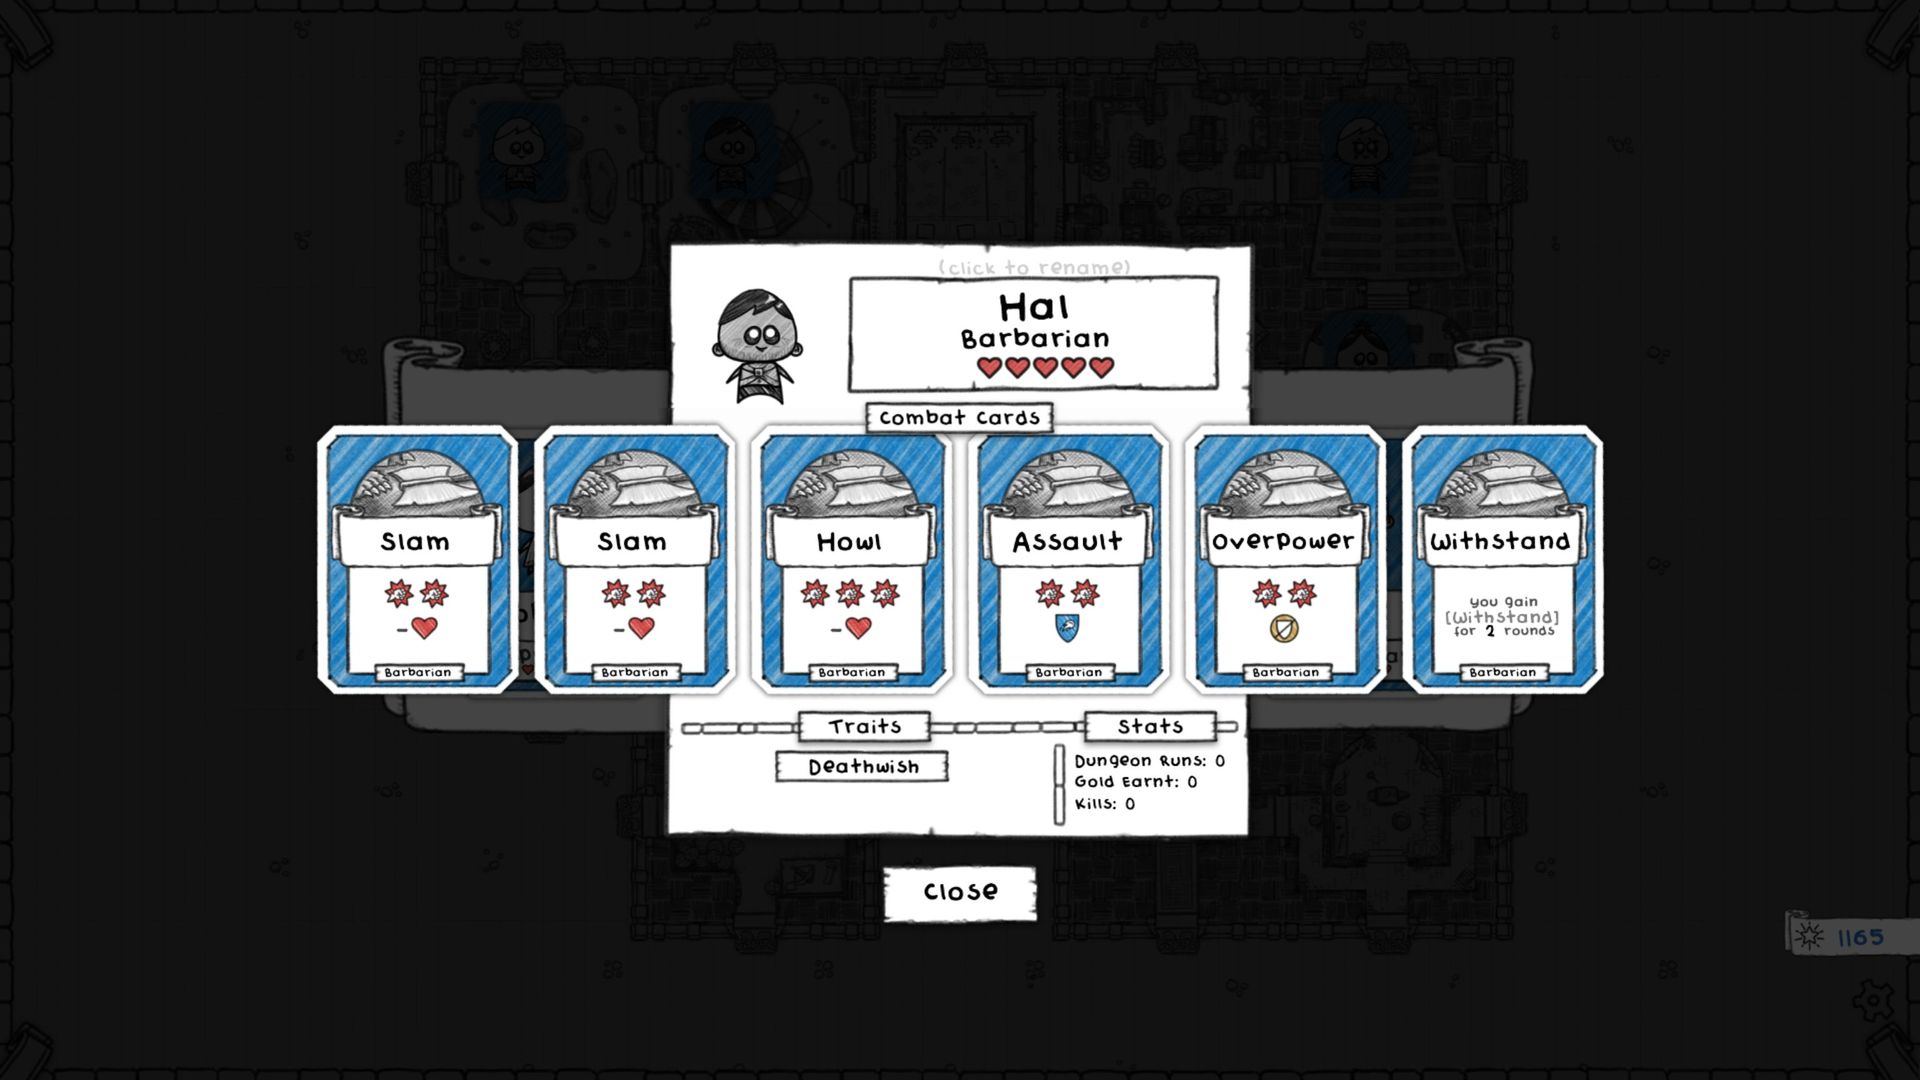
Pictured: A fresh Barbarian’s character sheet.
The hearts on top are his health. As he defeats monsters on a quest, his level grows, as does his health, only to be reset when the quest is done. It can also be increased with equipment collected from monsters and treasure, which also gets reset after the quest.
Really, the ways to make your guys stronger in Guild of Dungeoneers are not your typical RPG methods, which is why I would consider this game to be a Card Game first.
The six cards below are the cards the barbarian class starts off with. They will become clearer when we start a quest. Basically, you use these cards to perform actions in battle.
Further below that are the traits the character has, as well as his stats.
Let’s try to explain the stats first.
Your characters die, more often then not, in Guild of Dungeoneers. When that happens, you lose them for good. Since there isn’t much you can do in the way of progressing them, you don’t really lose much. And another character of the same class even arrives at your guild two turns later, so really, you just aren’t able to play that class on the very next adventure.
Left of the stats are the traits. Traits are things that, in some way, affect base stats, how you deal or receive damage, or how your character behaves in combat.
Some of these can, I believe, be innate to the character class.
Others can be gained as “scars” at the end of a quest. Those scars start out as relatively weak, having a notable downside, but after multiple victories, they level up and the negative gets pushed out, while the positive gets stronger. That’s one way of making your character stronger. Really though, it matters little, since the characters die often anyway.
Traits can also be gained through equipment, but as I said, that gets reset between quests, so it’s even less permanent.
Clicking Expand Guild from the main menu takes us to the upgrade screen. This is where we spend our gold to purchase additional rooms for the guild.
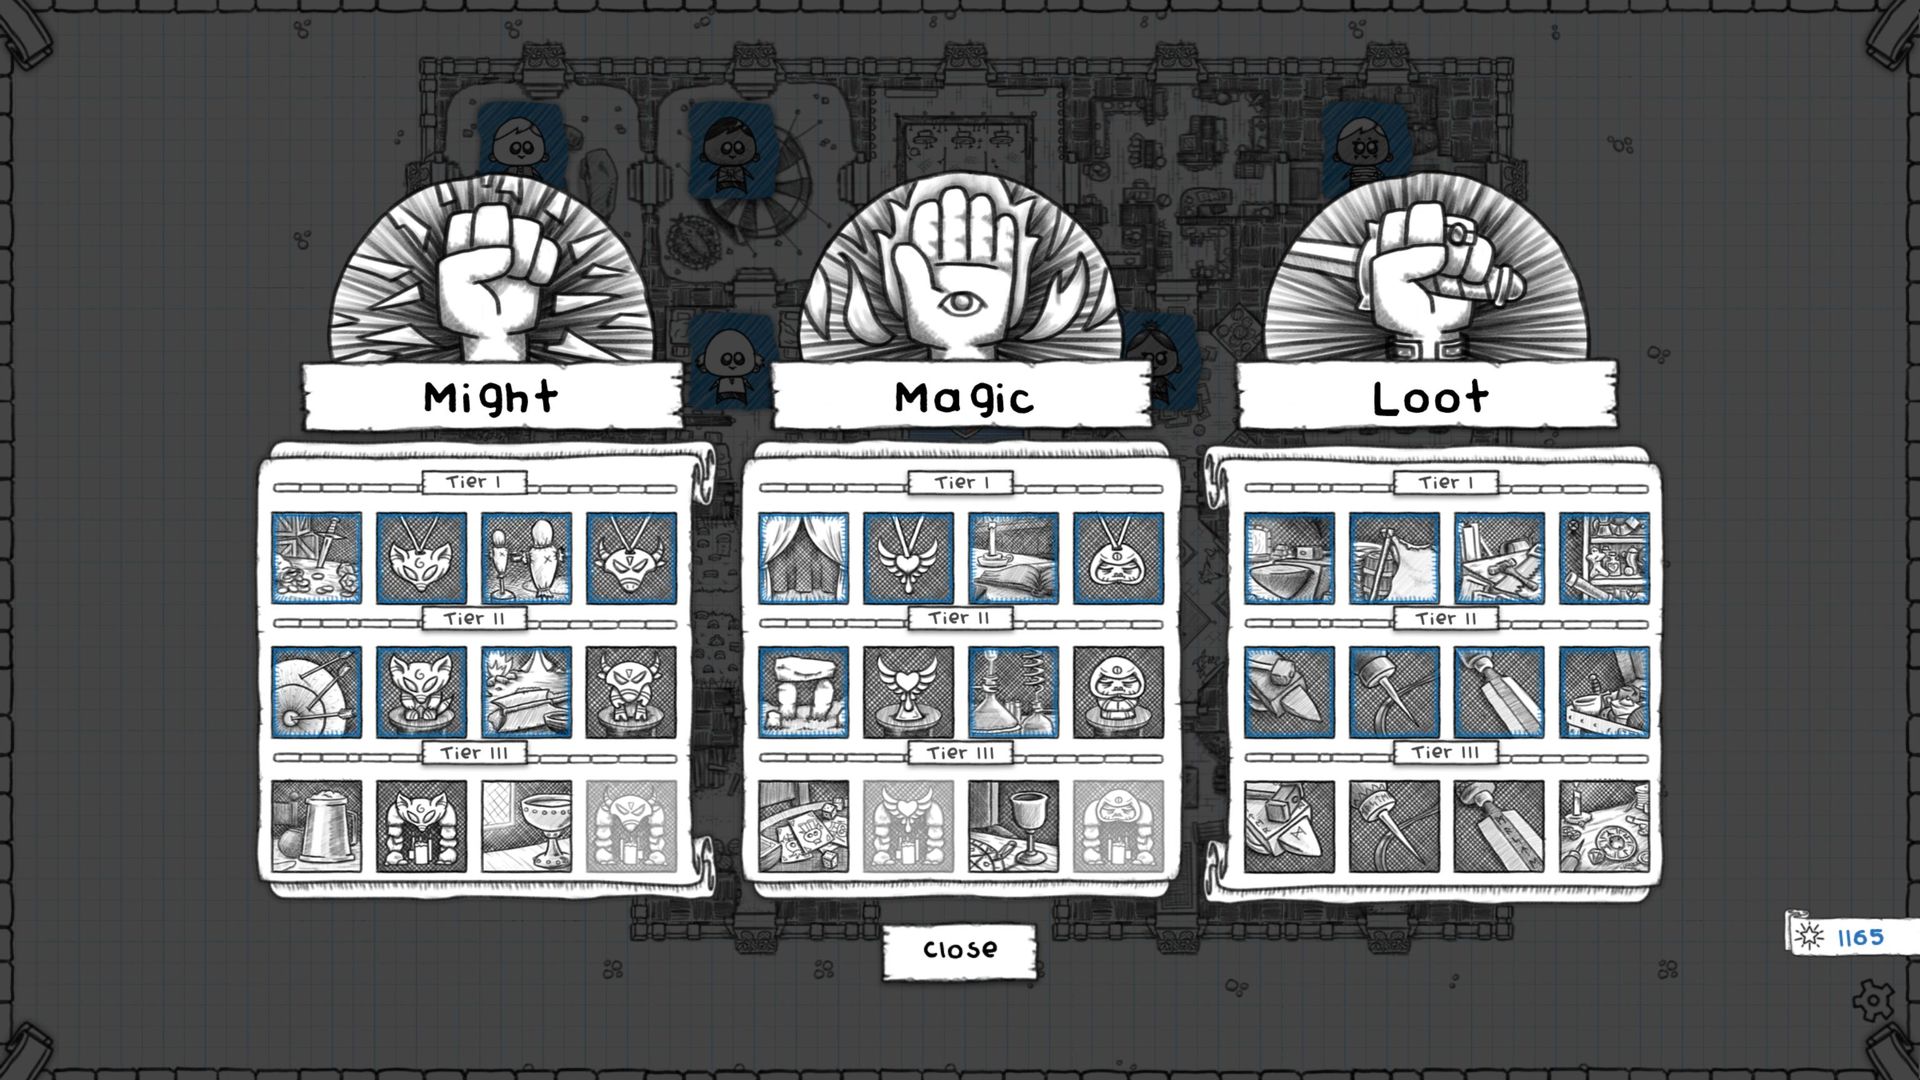
Pictured: The Guild update screen
As you can tell, I got a bunch of them already, but I would not say I’m close to getting them all. You see, the first row of upgrades costs 100 gold each, the second goes for 500, while the third reaches 2000 per upgrade. While gold earned in quests increases with higher level quests, right now, it seems to me like it doesn’t keep up, so the upgrades are starting to get grindy.
Upgrades are another way to make your characters persistently stronger and increase their chances of winning. This isn’t a direct effect, though. In each tier of upgrades, there are simply 3 upgrade categories, each giving access to stronger stuff you can use.
The first category unlocks new character classes. These new classes really do seem stronger than the previously accessible, so effectively, classes can become somewhat obsolete.
Other upgrades unlock a new blessing which you can use on a quest. This blessing is selected before starting a quest and gives you bonus such as added health or damage for a number of fights, more loot choices, etc.
The third set of upgrades simply unlocks stronger loot drops from within quests. You still get a chance for just the weak stuff to drop, but the chances of getting something good are increased overall.
But enough about that. Let’s start a quest.
Let’s click Go Exploring
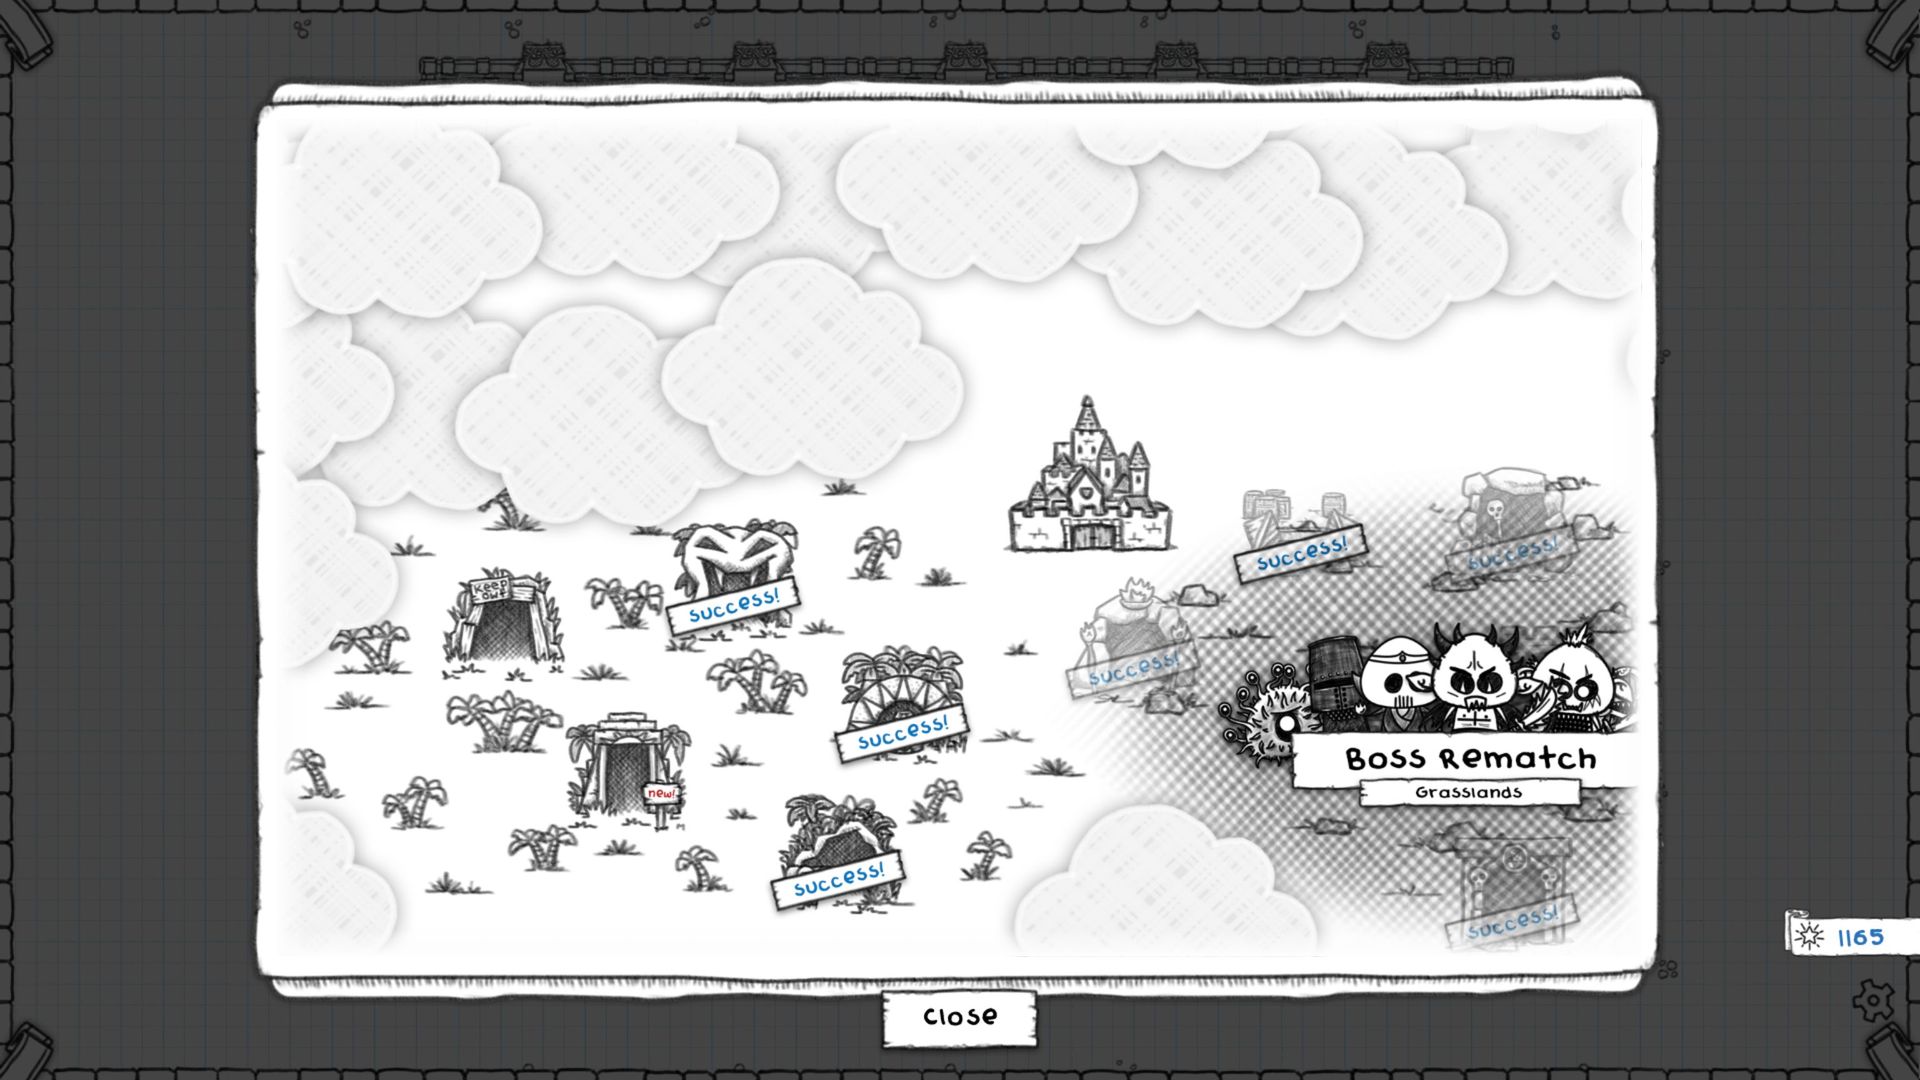
Pictured: The World Map
We’re on the world map now. The big castle is the town where our guild is located and doesn’t really do anything here other than adding detail to the map.
The scary looking picture of monsters to the right is a group of dungeons we’ve already cleared, kind of like world 1. Once we did, they got replaced with this big scary option to retry fighting one of the bosses in those dungeons, for glory and, more importantly, easy money.
Each of the other icons is a dungeon, or as the game calls it, an adventure, where you need to clear several quests. Usually, it’s 2 per adventure, but I think a couple may have had up to 3.
The Ogre Menace Adventure
I’ll be honest. I’m fully expecting to get my ass handed to me. Let’s try the one I failed at the last time anyway. The one with the keep out sign all the way to the right.
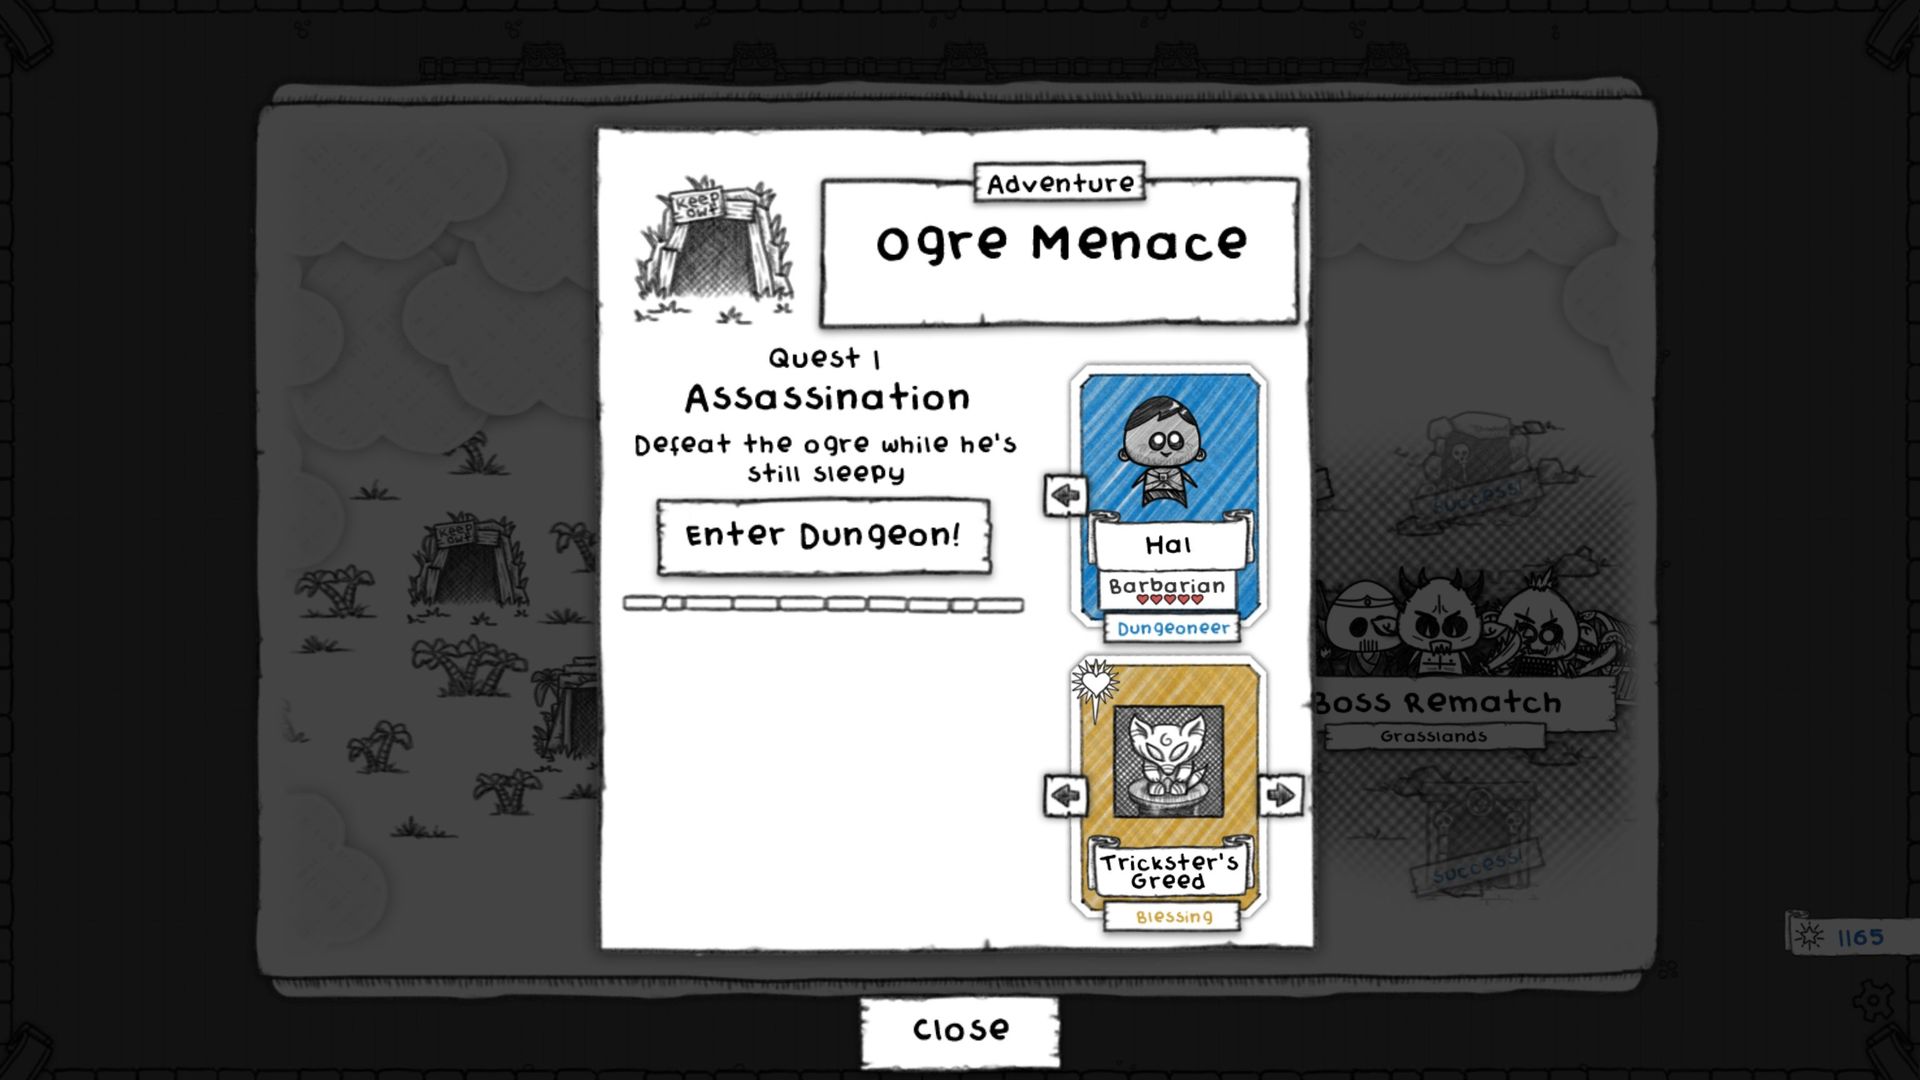
Pictured: Starting the Ogre Menace Adventure
The adventure is called Ogre Menace and has several quests, but I have yet to beat the first. The goal here is to defeat a relatively strong monster before it wakes up. That means I have a turn limit under which i need to strengthen my character by fighting weaker monsters, in addition to reaching and defeating the target monster.
I get to pick the character I want to attempt this with, which is going to be the Barbarian, since they are my second-favorite second tier class. My favorite is the Ranger, but I lost with one on my last attempt and did not get a replacement yet.
I also get to pick a blessing, so I’m going with my usual choice of Trickster’s Greed. This is a second tier Trickster blessing, which grants me extra options when drawing loot cards after fights, or from chests. This means I have better odds of getting good gear early, but this will become clearer after a fight or two.
Let’s start.
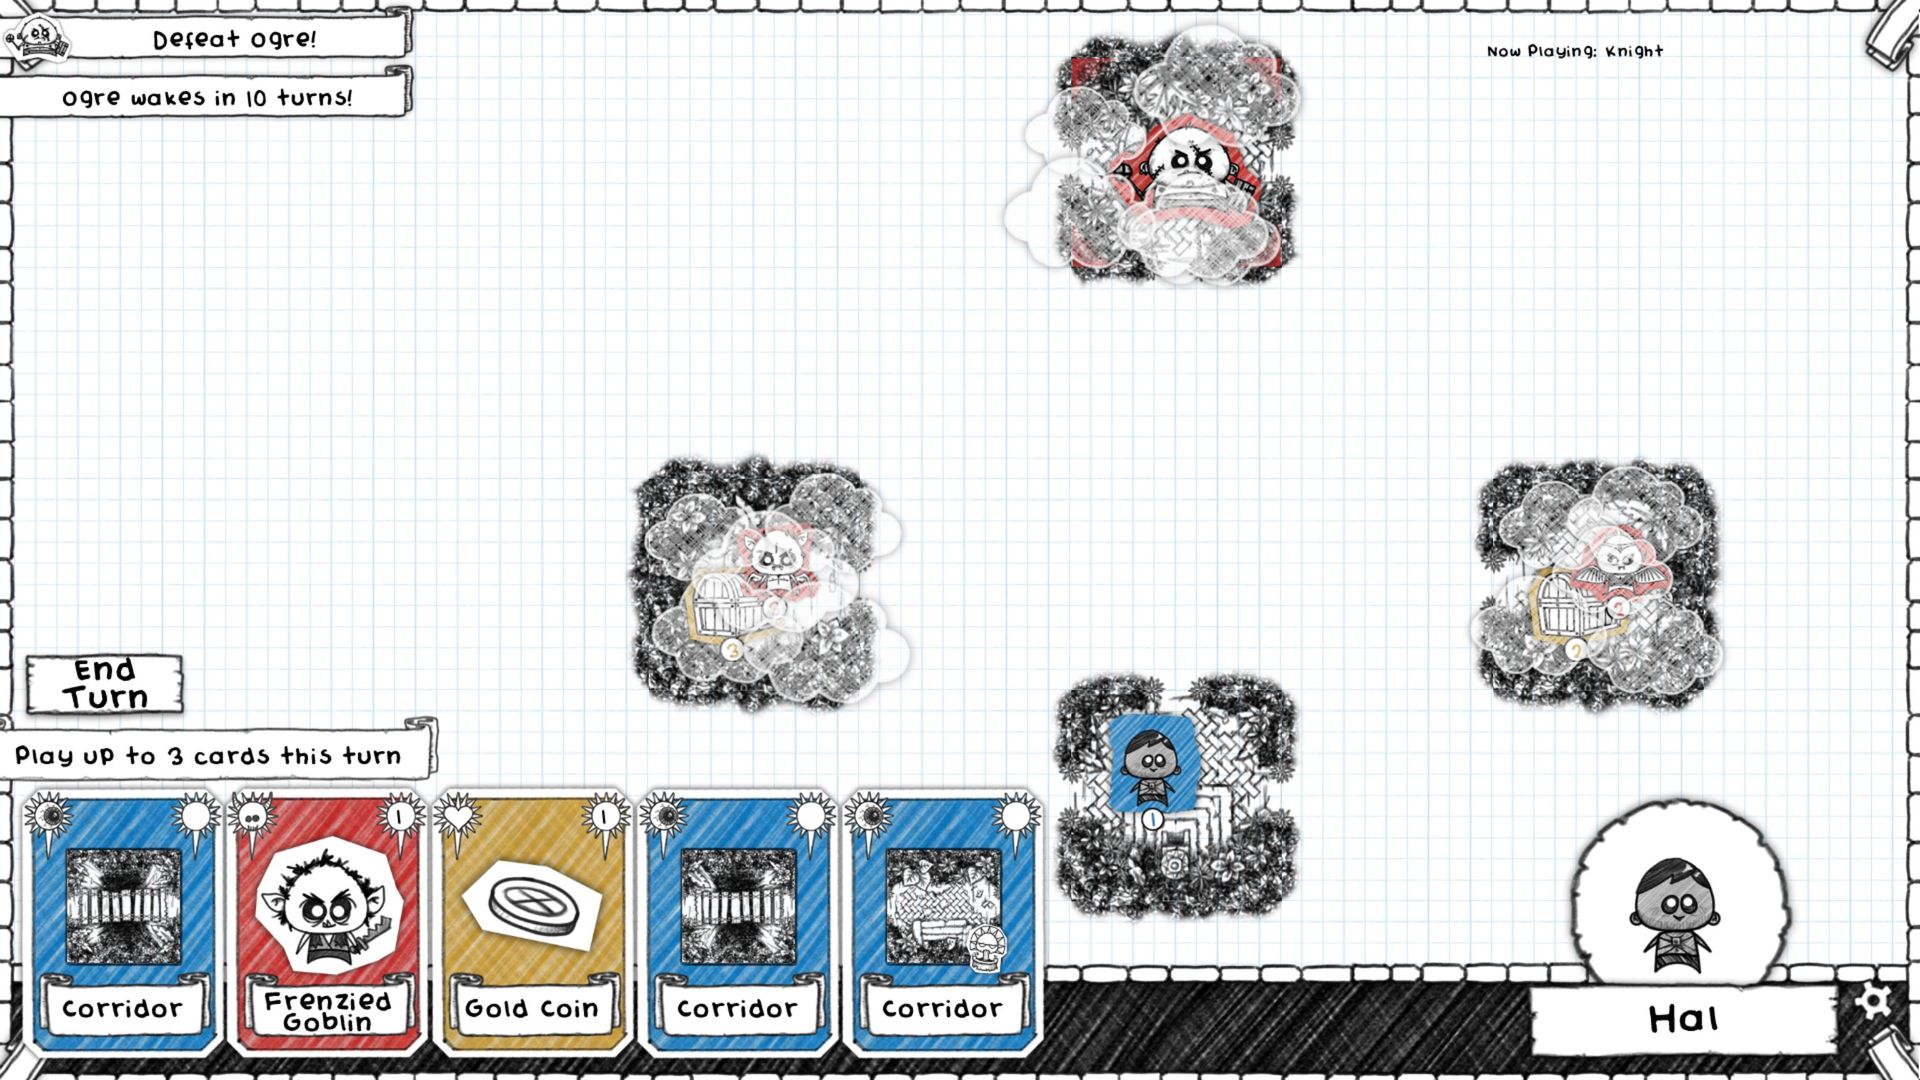
Pictured: The first turn of the adventure
So what are we looking at here?
Card placement on the map screen
Our characters in on the bottom tile. There are monsters to the east or west and our target boss monster the north. We can’t reach any of them, though.
We also have five cards drown, three of which we can play.
The blue cards, we place on the map, basically creating dungeon terrain that way.
The red cards are monsters we can then add on empty terrain tiles, one per empty tile.
The yellow cards are treasure we can put on those same tiles. A single treasure can share a terrain tile with a monster and that’s it.
Now, it’s not just a matter of placing these tiles and moving around. We don’t get to decide where our dungeoneer moves to. We do get to affect that, though. By default, dungeoneers will try to reach monsters they think they can beat, but will prefer to go for easy treasure if they can.
There are traits which can affect their behavior. For example, some traits cause dungeoneers to prefer going for fountains, which can appear at random at placed terrain tiles. Other traits cause dungeoneers to target higher level monsters, but also get bonus health when fighting them.
In addition to that, some monsters can move to.
Overall, the goal here is to strategize. We want to place monsters into the path of our dungeoneer which enough so they can win, but also strong enough to drop good loot and increase the dungeoneers level. We also want to drop treasure to increase our gold earned and we want to shape the terrain in a way that allows us to reach any end goals in time.
And really, that’s about it. The only thing we have to learn now is the combat, so let’s place some cards and fight.
I got 3 terrain tiles, all placing east-west always, which don’t really help in reaching the treasure on the map, or the end goal. Next, I have a level 1 monster and a level 1 treasure. With few options, I decided to place all 3 to the east of my starting tile, causing my dungeoneer to fight the goblin for the meagre amount of gold they’ll get from that treasure.
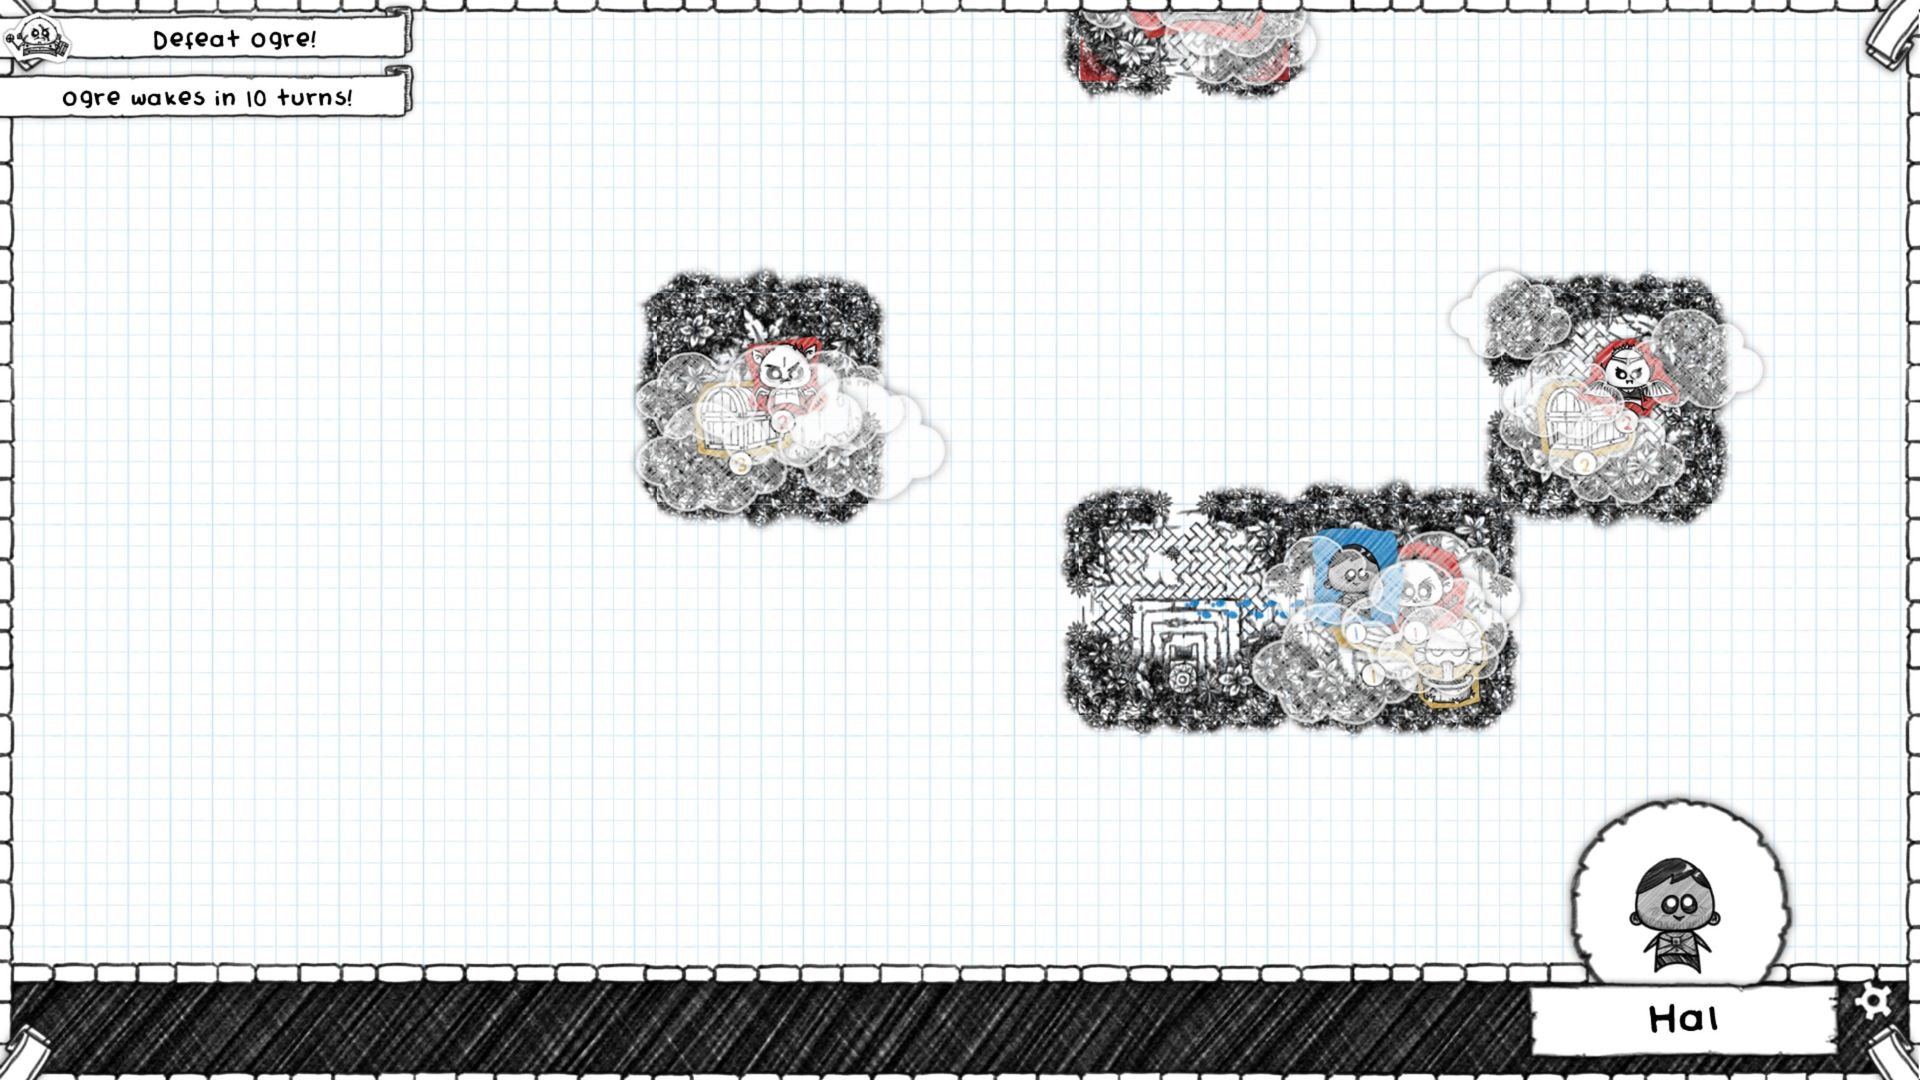
Pictured: The state of the map right after placing the first 3 cards
As soon as I placed the three cards, my dungeoneer started moving towards the monster and I got into a fight
Battle
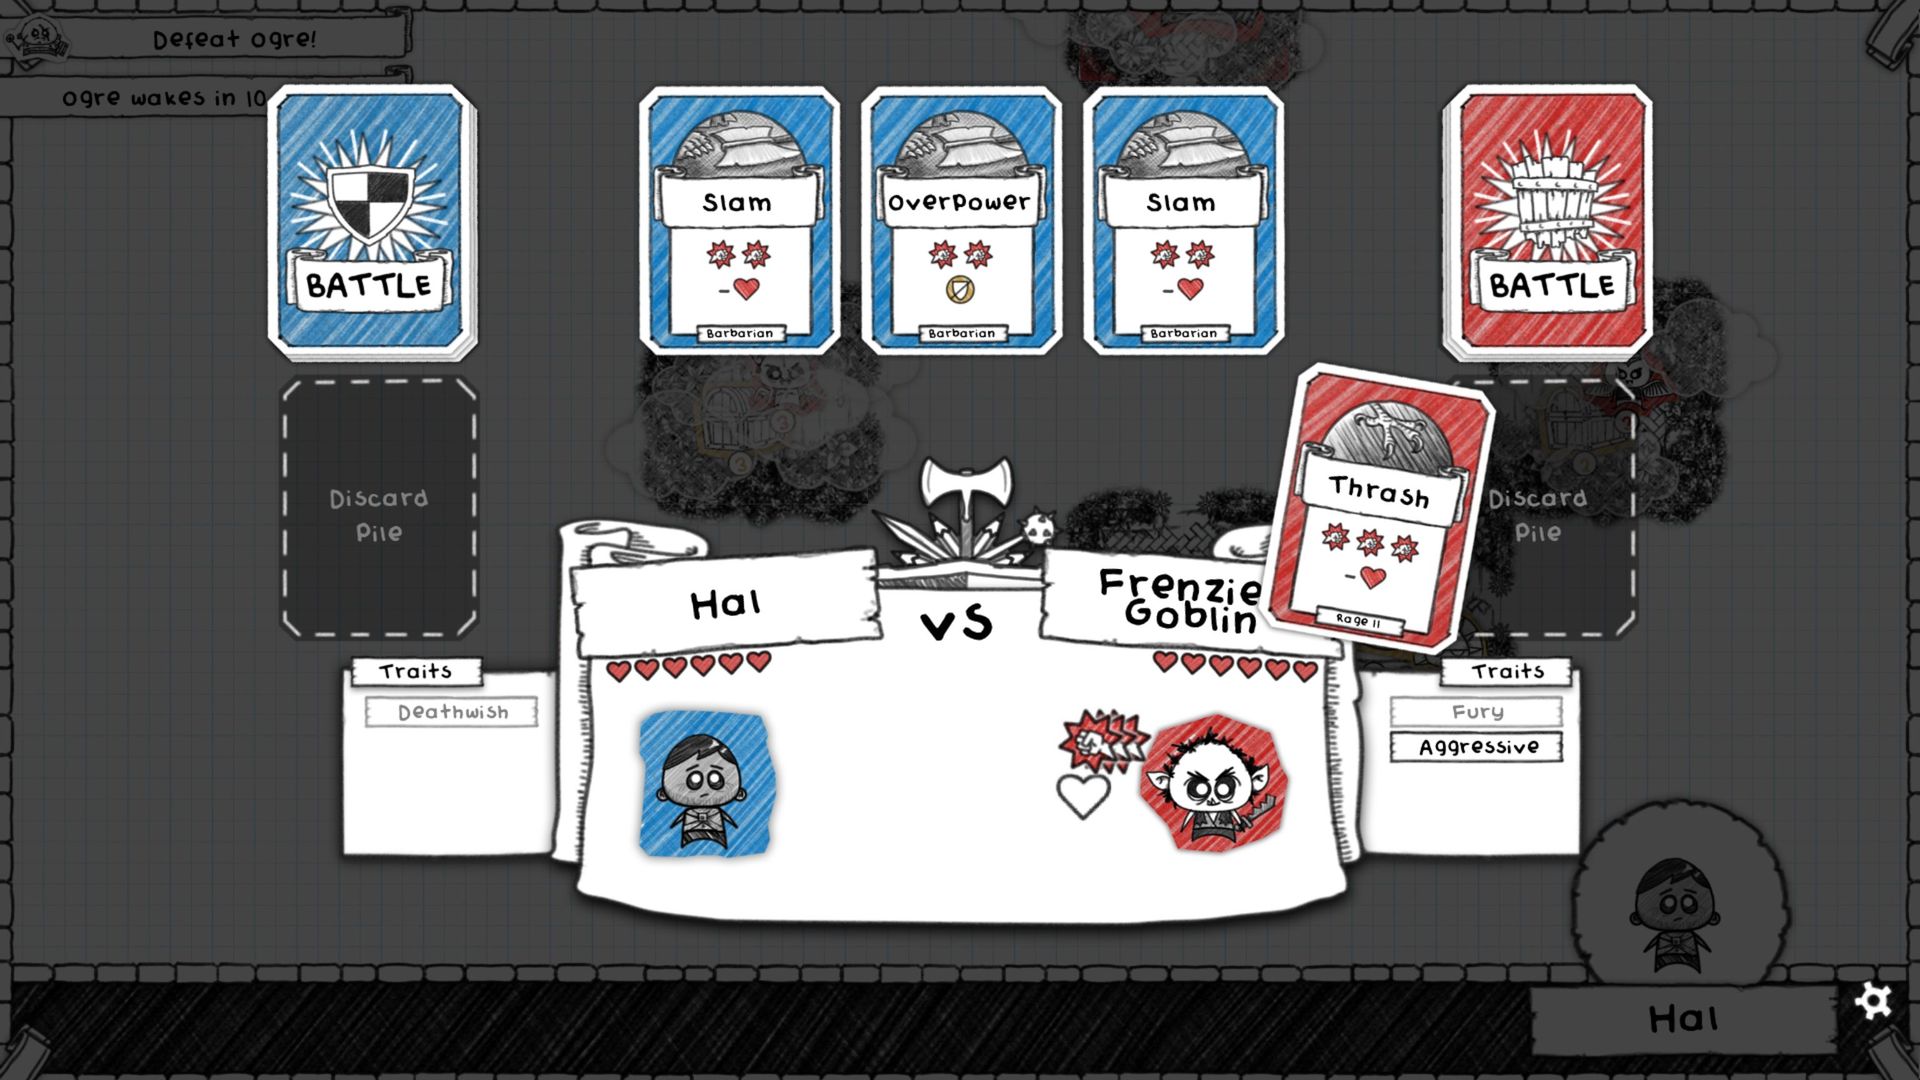
Pictured: The first turn of a battle against a goblin
So what are we looking at now.
At the bottom, from left to right, it’s, my character’s traits, my character and their health, the enemy and their health, and the enemies traits. My Deathwish trait causes me to prefer fighting higher level monsters. It doesn’t apply at the moment, so it’s greyed out. The enemies Fury trait causes them to do more damage when below 50% health, while their aggressive trait causes them to chase my character across the map. For some reason, the game considers that one to be applicable.
On the top are the cards from my deck that I’ve drawn this turn. This is my first fight on this quest, so I only have 6 cards in my deck total – the ones provided by my class. Once I win some fights and collect equipment, that equipment will add more cards to my deck, some good, some bad. Once I spend all my cards, my deck is reshuffled and I can draw again, so you never really run out.
Above the Goblin is the card he’s gonna play this turn. This gives me information to decide which of my drawn cards I will play.
I see that the goblin will play a card that does 3 damage to me, while also self-inflicting one damage. On the other hand, my 2 choices (since 2 out of the 3 I have are the same choice) are to either deal two damage and self inflict one, or deal 2 unblockable damage indicated by the yellow shield icon.
Usually, damage can be blocked by shields. Red damage, meaning physical, is blocked by cards with red shields on them. Blue damage, meaning magical, by cards with blue shields. Normally each shield point blocks a damage point, but there are special effects and icons that can come into play.
In this case, the only option that makes sense is to do the two unblockable damage, even though there’s nothing to block it anyway. At least that way, I get to keep 1 heart on me and hope I get a better card next turn.
Let’s do just that.
Pictured: The result of playing out the first battle card
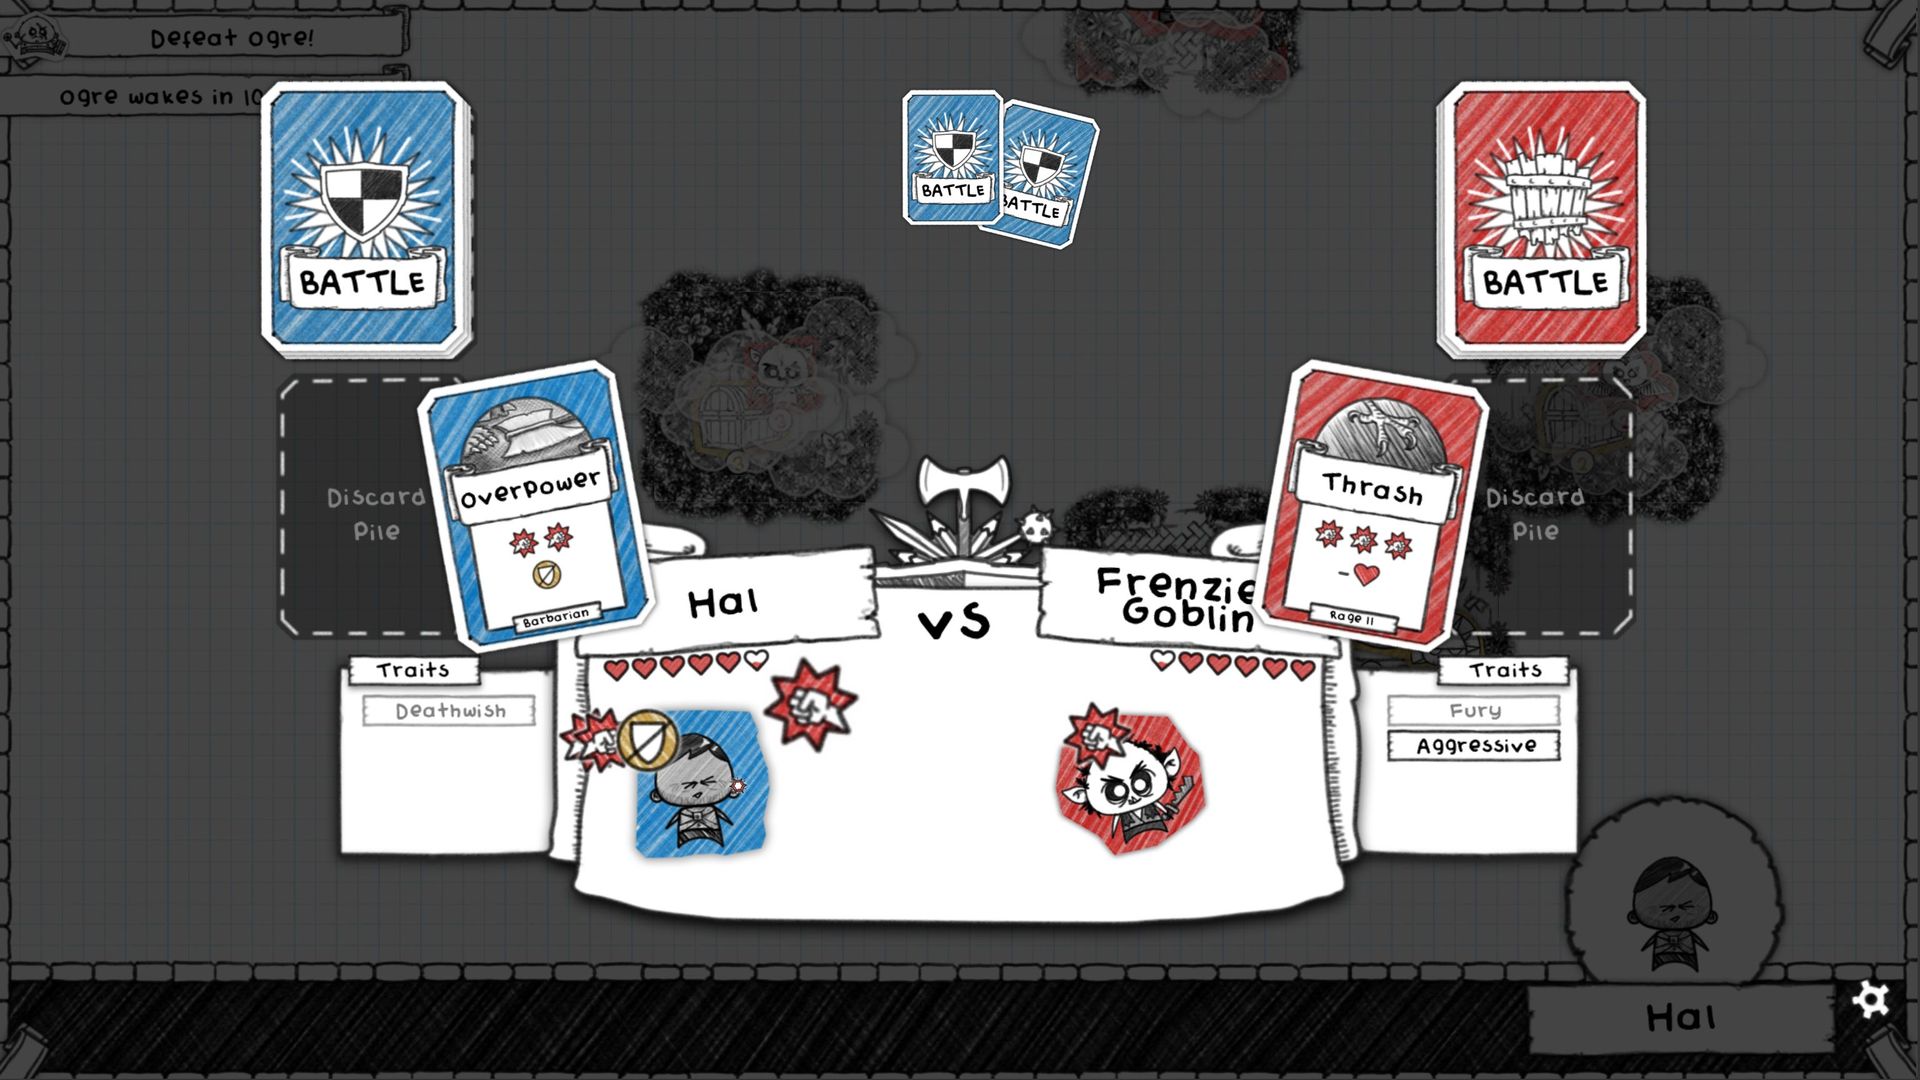
Both my character and the monster act. The monster gets to go first, unless I perform a quick attack, which I did not, since I didn’t have the appropriate icon on my card. I guess that’s how the fact that I get to see the monster’s next move is offset. We end up with 3 damage each, since the monster self-inflicted one damage.
Pictured: The second turn of the goblin battle
Now, my choices are the two remaining cards, which would both outright kill me when the card the goblin will use adds up to the one point of self-inflicted damage.
I also get to play Withstand which causes me to gain back one health if I end up with zero, for two turns, effectively preventing me from losing just yet. On the other hand, the goblin plays a 2 damage card with the additional effect of being able to pick one of the cards in my hand to discard. I’m OK with that, since both are the same card and neither is helpful to me at the moment.
It does, however, mean that I’ll only have two cards next turn – the remaining Slam card and whichever additional card I draw next.
I drew Assault, which is a 2 physical damage, one magic damage card. I have the Withstand effect active for one more turn, so it doesn’t really matter which one I play. Assault is more useful to keep around, so I play Slam. I die and I’m back to 1 health due to Withstand. The goblin is down to one health to.

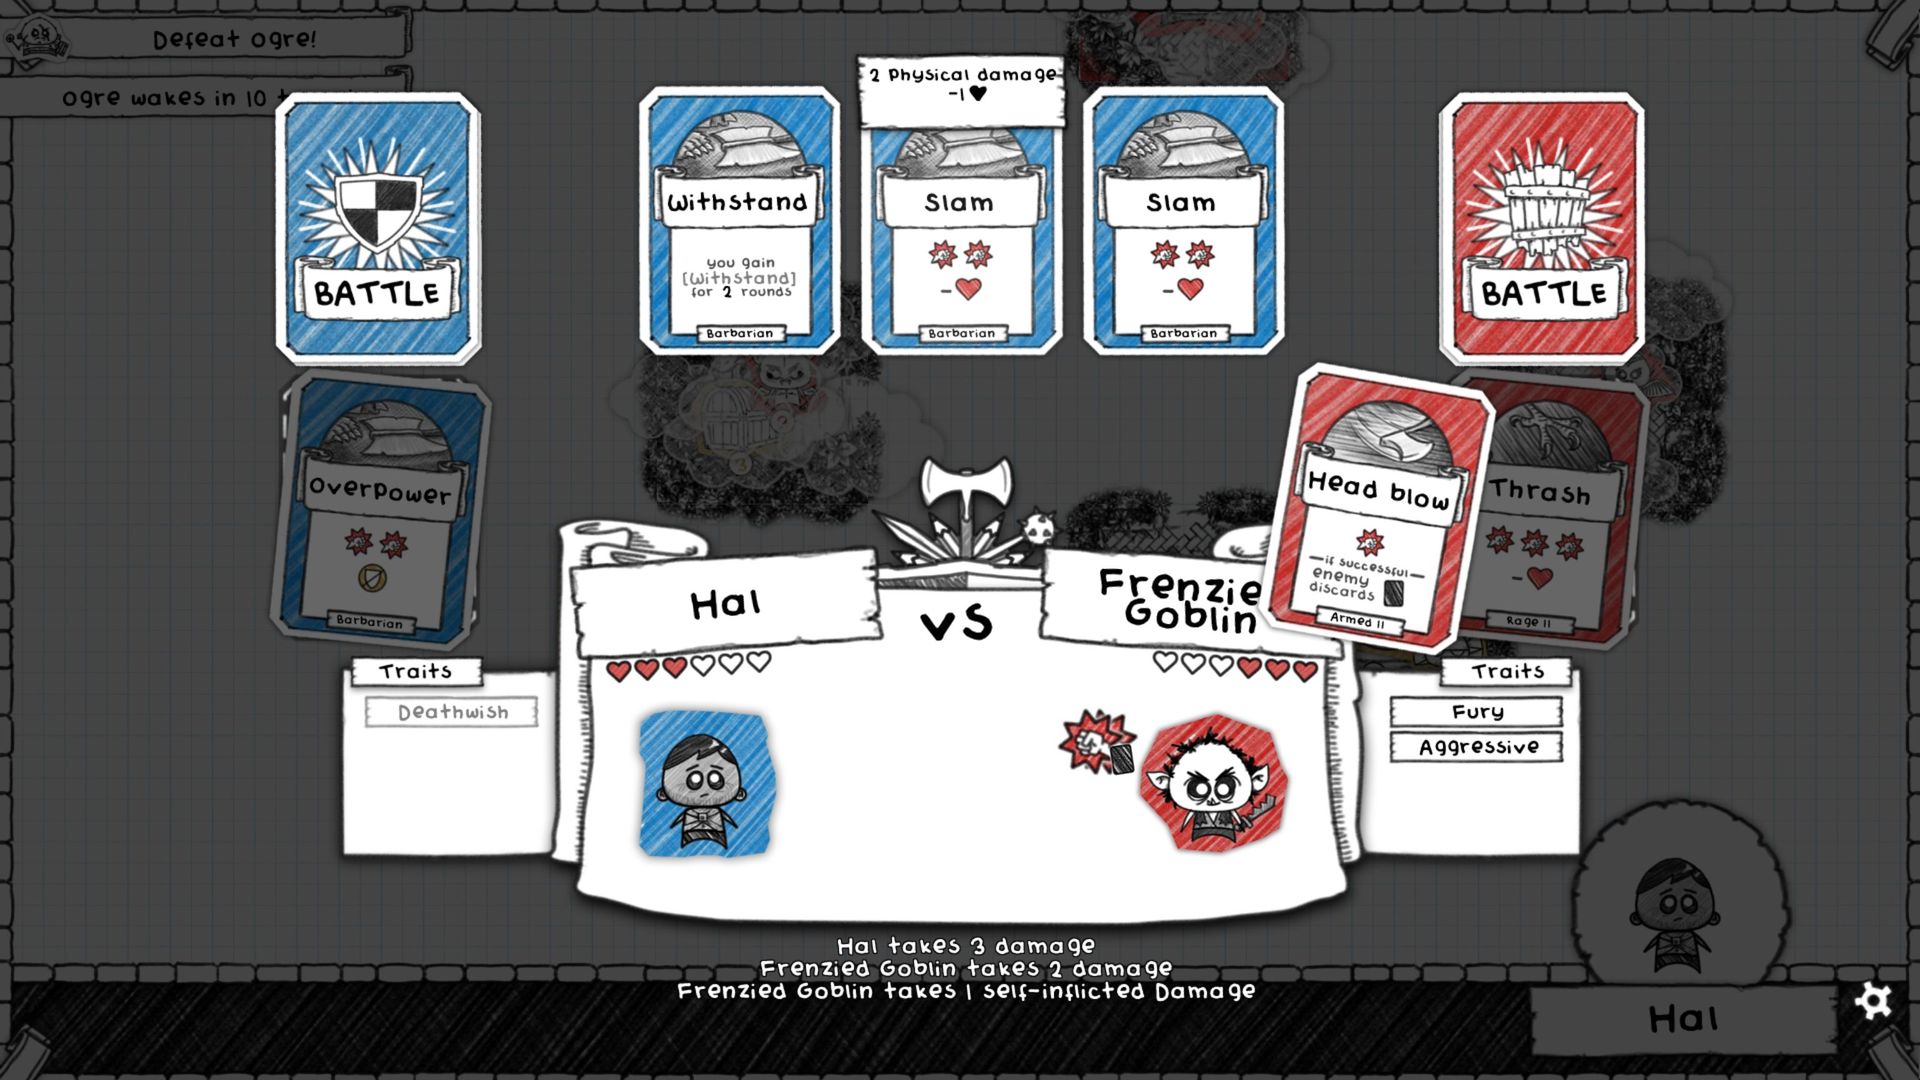
Pictured: The last turn of the goblin battle.
I drew Howl this time, which is slightly stronger than Slam, but really, the only thing that could’ve saved me would have been a quick attack card or a healing card, none of which I have. Both myself and the goblin will die the next turn, regardless of which card I play.
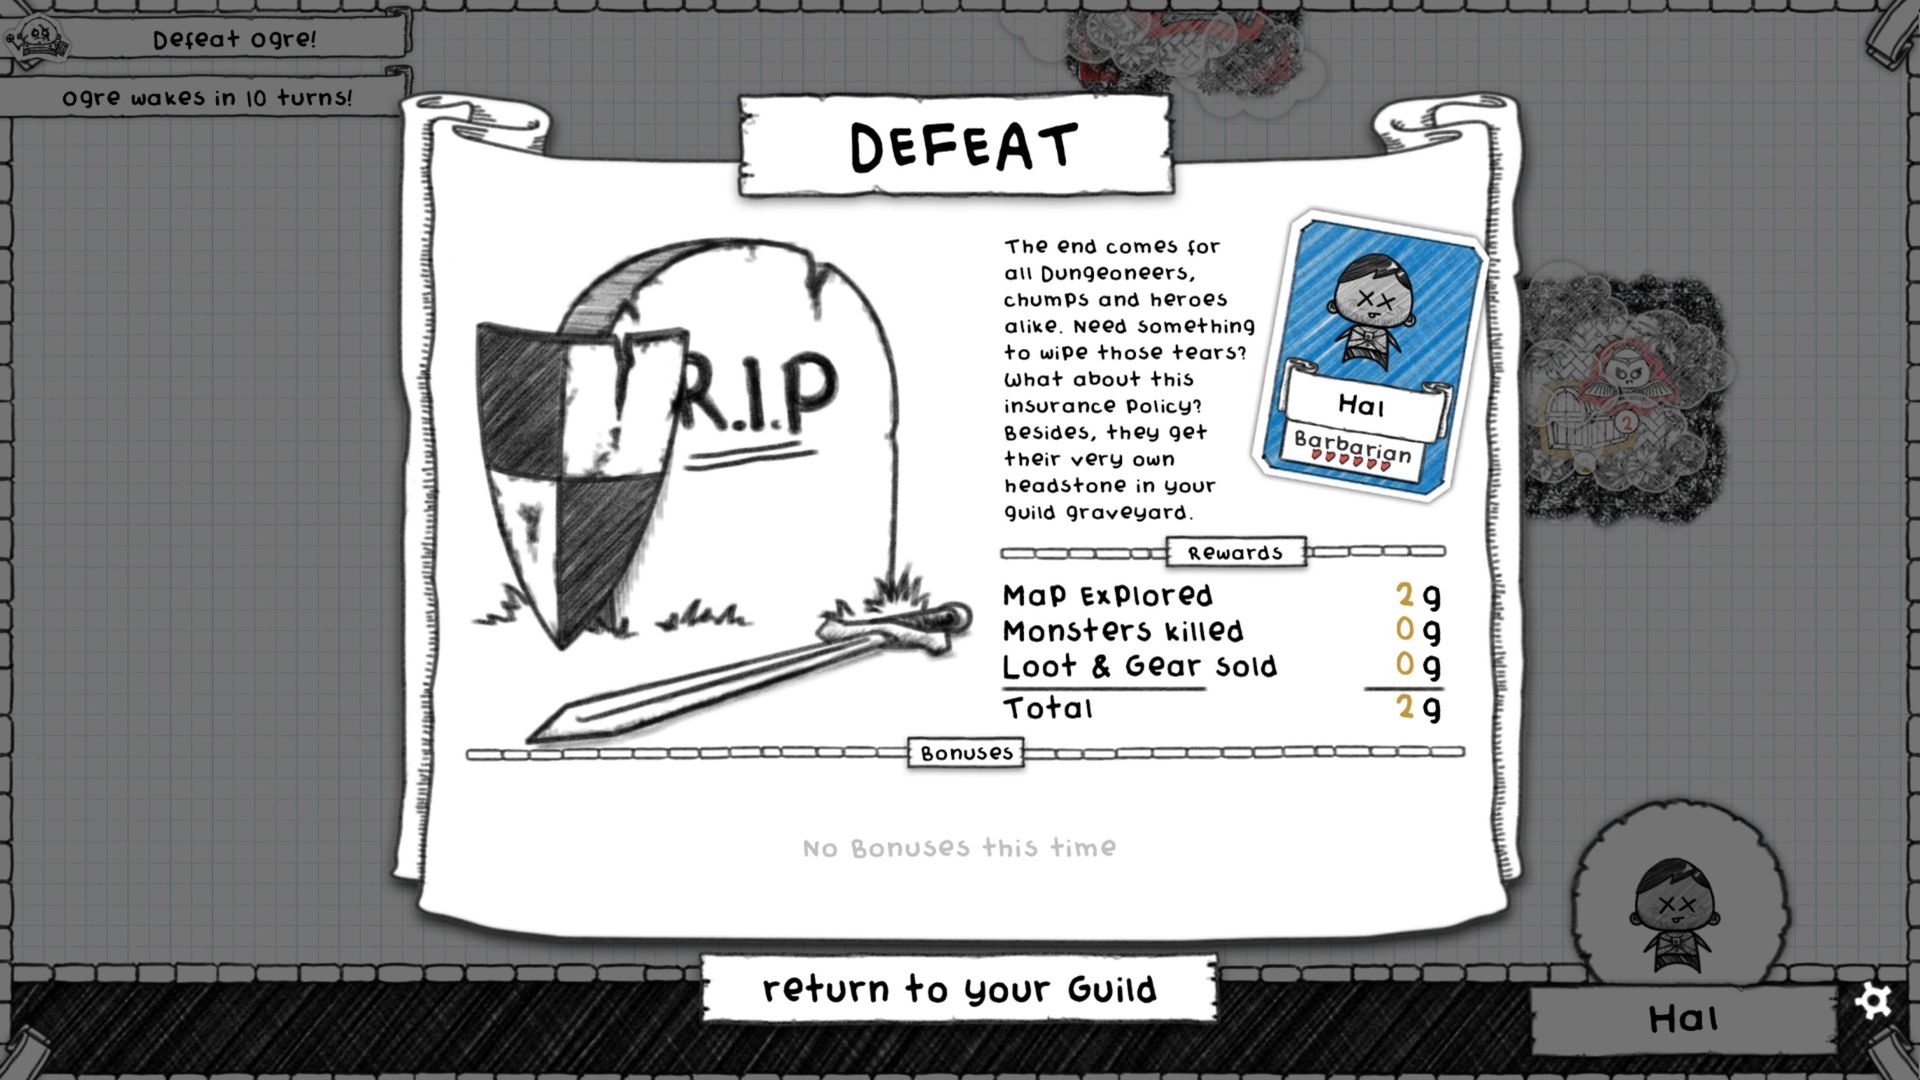
Pictured: The defeat screen
And that’s it. I tried to play a quest and I lost.
This is how the game usually goes.
On occasion, we end up with slightly more than two gold. On occasion, we win. Usually, we die to try again.
And it’s fun, and funny.
I don’t think it will stay fun for too long. I’m sort of at a state where I’m either having to rely on luck and good draws, or feel like I have to grind on Boss Rematch to get one of the stronger upgrades and up my odds of winning at least by a degree.
The game has strategy and depth, but it also relies on chance, a lot. We can drastically reduce that chance by selecting the correct gear, placing the correct cards. However, even the strongest strategy, the highest skill, can easily be offset by bad draw, and I can see how this can become annoying.
That being said, I didn’t completely uncover the map yet, there are upgrades I can buy and I’m still very much interested in where this will take me.
I’m just not 100% sure I’ll stay interested until the end credits. I hope I will.
Official
Other blogs
Related Posts:
Original URL: http://addictedgamewise.com/guild-of-dungeoneering-playing-through-a-quest/