From The CRPG Addict
 |
| The party prepares to unleash death on a dracolich. |
Black Crypt‘s approach to magic might be its most unusual feature, and it’s something I didn’t highlight very well in the first two entries. Each spellcasting class (cleric, druid, magic-user) has five spellbooks, each with four spells, for a total of 20 spells per class. Each starts with a “starter book” and has to find the other four during dungeon explorations. However, some of the spells are level-dependent, so even if you find the book, you may have to wait for a higher character level before you can cast them. By the end of this session, my characters had, and could cast, every spell.
 |
| I find the last spellbook that my cleric needs. Note that my druid has a group of offensive spells lined up. |
The spellcasting interface is a bit too annoying to open in combat, especially if the enemies are casting spells themselves. When a spell is cast, everything else freezes until it finishes, and it’s easy to get confused as to whether the game has registered your clicks on your own spells while you’re waiting for an enemy spell to complete. However, each character can prepare up to 5 spells ahead of time in the stone tablet and then launch them one-by-one as soon as they’re needed.
The unusual aspect to Crypt‘s magic is that the act of preparing a spell starts a “cool-down” period unique to that particular spell. I don’t know if the cool-down period is dependent on level–I haven’t been keeping track that carefully–but at Level 10, it seems to take between 2 and 2.5 minutes for just about every spell, no matter the class or level.
 |
| The third spell in this book, which looks like random runes, is actually “Vorpal Air” in its cool-down phase. |
This approach to magic has a few consequences. The first is that in the heat of combat, you can’t cast the same spell multiple times–not unless you’ve had the foresight to prepare it multiple times, with the requisite breaks in between each one. The second is that there’s no downside to exhausting your spellbook. Since each spell is on a different timer, you gain nothing by holding anything in reserve. It’s not like Eye of the Beholder, where you have a limited number of spells per level, or Dungeon Master, where all spells draw from a limited mana pool. You don’t have to worry about any kind of trade-off between offensive and defensive spells because they use separate resources.
Obviously, if you insist on blasting every enemy with spells instead of using melee weapons, you’ll run into a situation where the spells don’t have time to regenerate before you meet the next enemy. But you also want to avoid the reverse scenario, where you waste a lot of time waltzing enemies to death instead of using your magical resources. At any given moment, some spells ought to be in the process of cooling down.
As to the spells themselves, they basically come in four categories:
- Offensive. These include the cleric’s “Poison Cloud,” “God’s Fury,” and “Vorpal Air”; the magic-user’s “Fireball,” “Death,” and “Lightning Field”; and the druid’s “Swarm,” “Blast of Cold,” and “Chant of Doom.” The druid’s fifth spellbook–the Book of Fire–is all offensive, with great names like “Stonefire,” “Firewind,” “Fire Vortex,” and “Fire Maelstrom.” These spells all do a variety of damage, but I’m not sure the type of damage really matters. If individual enemy types have resistances to some spell types, it’s not obvious during gameplay.
- Defensive. There are only a few of these, including the druid’s “Protection” and “Shadow Shield” and the magic-user’s “Shield,” “Strength,” and “Ethereal Shield.” Except for “Strength,” which just adds 2 to a single party member’s strength, the others all improve armor class. The game could have benefited from more buffing options.
- Healing. These are almost all in the cleric spellbook, and include three levels of regular healing plus spells that cure poison and disease and raise dead.
- Exploration. These include the cleric’s “Reveal Truth,” “Create Food,” and “Sustenance”; the magic-user’s “Wizard Sight,” “Compass,” and “Detect Traps”; and the druid’s “Read Runes” and “Light.”
A lot of the healing and exploration spells are duplicated with potions and scrolls early in the game. These become less important as you acquire the spells, but it’s still useful to have some backups in case, say, two characters are poisoned and you don’t want to wait for the cool-down period on “Cure Poison.” Also, some traps, glyphs, and magic fields only respond to very strong castings of these spells, and sometimes the scroll versions are higher than your character level.
I haven’t given enough attention to “Wizard’s Eye.” When active, it creates an automap of the dungeon. I didn’t think this was necessary because I was mapping it myself. I even tossed a magic ring that would have kept the spell going continually. Later on, I found that the magic-user’s seventh-level “Teleport” spell, which takes you anywhere on the current level, depends on the automap. This useful spell not only saves time but can be the only way out of some tight situations, such as when multiple enemies have you boxed in a corridor.
 |
| I’ve been mostly ignoring the automap–to my peril. |
I’d also note that the cleric’s fourth-level “Sustenance” spell completely replaces the game’s food and drink system. Once you have it, you can ignore food and water completely (and you can already ignore food after the third-level “Create Food”). I hope that remains true throughout the game and the developers don’t introduce a large no-magic level that makes me sorry I haven’t been stockpiling meat.
 |
| I bet you get this same message even if you solved the puzzle in seconds. |
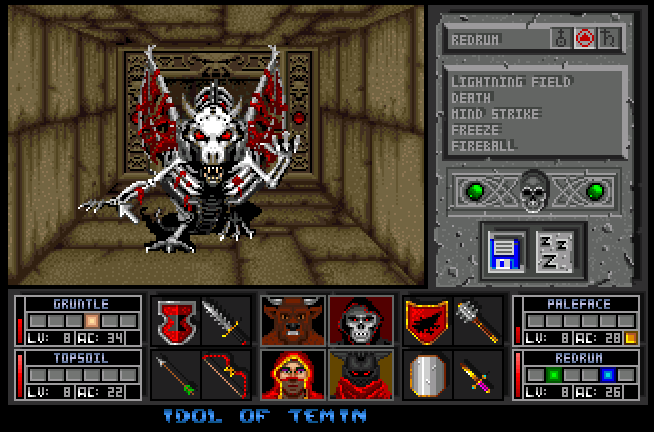
When I last wrote, I was entering Level 10. It turned out to be a large level, occupying most of a 30 x 30 area. It was extremely heavy with switches, buttons, and teleporters, some causing effects in far-flung areas, and I had to make multiple laps around the level before I found everything I needed. Moving on to the next level required me to find three Idols of Temin and put them in three alcoves, only the idols could only be picked up by some special Gauntlets of Temin and only carried in a special coffer.
 |
| Apparently, a lot of adventurers died trying to get to that coffer. |
One-eyed spiders dogged me the entire level. They came in large and small versions, and the large ones dissolved into a group of smaller ones when they died. Both were capable of poisoning characters. The level’s final battle was with the dracolich pictured at the top of this entry; he was unleashed when I put the last Idol of Temin in place. The first time, he took us apart in about three seconds. The second time, I had 15 offensive spells ready to go. He died on the 13th.
 |
| The larger variety of one-eyed spider. |
Overall, this level took about 3 hours by itself. It was then a relief to find that Levels 11 and 12 were both quite small. They were “reward levels,” with no monsters and plenty of food, water, and safe places to rest. They also delivered several tablets, some equipment upgrades, and the final spellbooks that I needed.
Level 13 came after another major loading transition. It made Level 10 look like nothing, occupying parts of almost all of its 40 x 40 space. The level didn’t have a single button or switch, but it did have a lot of teleportation plates.
The enemies went up a level in difficulty. It’s hard to even describe the first type, some kind of floating crustacean-like figure with claws and a bulbous head that looks like one of those novelty lightning balls we all had in the 1980s. They were capable of magic damage, plus a spell that freezes the party in place for a few turns. The second enemy was another small spider, but without the single eye of those on the previous level, capable of inflicting disease.
 |
| These guys are trippy. |
With the crustaceans, I just learned to have a barrage of spells ready and blast them. They were too fast and deadly for the usual combat maneuvers. I did have one advantage against the spiders: for some reason, they were unable to pass through door frames. But they had a ton of hit points and took forever too kill.
 |
| They’d like to come through the door, but they heard about what adventurers do in Dungeon Master. |
What was more annoying than the difficulty these enemies posed was that I seemed to be incapable of killing all of them. They respawned constantly, sometimes right in front of me, and I could never fully clear the level. Wherever I was, I could hear some enemy in the distance somewhere.
After I finished mapping the level, and particularly after I played a bit more, it became clear that Level 13 is going to be a hub of sorts for the rest of the game. When I was done mapping, I had four locked doors, four pressure plates that teleported me to other levels, and four “Orbs of Planes.” You’ll recall that the game’s main quest is to find the four magical weapons that had been wielded by the champions from the four guilds of Astera, and that the Black Crypt is the tomb built for those heroes and their weapons. Level 13 is the actual tomb.
 |
| Most of the large Level 13. |
Each teleportation plate brings the party to a new area where an Orb of Planes unlocks the way to a series of lower levels. Somewhere on those lower levels, the party has to fight one of Estoroth’s lieutenants, retrieve an “Octa Key,” and return to Level 13 to open one of the four crypts.
Even though this session had already gone on for a while, I decided to try one of the teleporters. It took me down to Level 16. Levels 16, 17, 18, and 19 were basically an interconnected maze with multiple stairways and pits, all occupying 16 x 16 coordinates. When I first arrived in the area, a scroll suggested that the “ram demons” in the area feed of the energy of spells and that I should only use weapons to attack them. Because the ram demons are hard, it was lucky this turned out to be a false scroll.
 |
| This was a lie when it came to the generic ram demons, anyway. The big boss was another story. |
The levels were swarming with these ram demons, plus a kind of fun, unique monster that we might call a “wall mimic.” It looks just like a regular wall except when attacking. You have to defeat it to move onward through the passage. Fortunately, wall mimics are stationary, so it’s easy to dart up, execute a few attacks, and dart away.
 |
| The first time you encounter one of these is terrifying. |
Level 19 was an open level where I had to walk a particular path (stepping off of it meant being teleported back to the previous level), but a scroll gave me the instructions. This brought me down to Level 20, where I met a much more impressive ram demon, and this one, I’m convinced, actually does get stronger when you cast spells at it. I was unable to defeat it with spells, in any event. Fortunately, he was slow and I could mostly waltz him to death.
 |
| Never have I been so grateful for a small strip of fabric. |
When I killed him, I was able to retrieve the Octa Key and then find a teleporter back to Level 13. The Octa Key opened the way to the tom of Krolic the Cleric, where I found his Doom Hammer. One down, four to go.
 |
| Plundering Kaolic’s Tomb. |
Miscellaneous notes:
- There were a lot of traps on the level, and I didn’t find a spellbook with “Remove Trap” until the next 10. I had to keep walking into the traps and then resurrecting one or two characters, which is a pain because you have to pick up and equip all of their items again.
- The game takes multiple clicks and about 90 total seconds to save, and about the same to reload. That’s long enough to discourage save-scumming.
- I found a lot of tablets aspected to the various character classes. You use these tablets by clicking them on the class rune on the inventory screen. Sometimes they raise attributes and sometimes they turn into a useful object, but equally often they “refresh” the character (restore fatigue, hunger, and thirst bars) or heal the character. It would be useful to save those tablets for when you need them, but there’s no way to tell what a tablet is going to do.
- The buttons got kind of ridiculous on some of the lower levels.
 |
| It’s not enough that I have to turn and face every wall, I have to really study them, too. |
- My characters all started with shirts and pants. During the game, the only “upgrades” we’ve found are the same shirts and pants but with named colors, like yellow shirts and brown pants. I have no idea if these alternate clothing items offer anything.
- In previous Dungeon Master-like games, if you were overwhelmed by difficult enemies, you could run to a safer part of the level and regroup. That’s not possible here. Once an enemy “acquires” you, it homes in on the party with 100% accuracy no matter how far you run. And enemies are just about as fast as the party itself. If you need to escape and catch your breath, the only option is to retreat to a higher level.
- I now have so many gems from dead adventurers that they’re seriously clogging my inventory. I wouldn’t mind an explicit hint as to whether these are ever going to be useful.
- I’ve given up trying to figure out how strong the various weapons are. I’ve just been assuming that whatever the latest one I find is, it must be stronger than the previous ones.
At this point, I still have Levels 14-15 and 21-28 to map. I assume each of the remaining three lieutenants will occupy an average of three levels each, and then there will be some sort of final battle. When I began the game, I didn’t think we’d be encountering Estoroth Paingiver himself, just finding the weapons needed to defeat him, but since he’s been leaving notes all over the dungeon, I suspect he’s going to be the final boss.
 |
| This turned out to be a “true” scroll, so I guess Estoroth Paingiver really does think we’re “brave.” |
This was a long session, but the last part–killing the ram demon and getting into Krolic’s tomb–was the shortest part of it. I’m hoping that the other three are equally fast. Maybe by the end of the next entry, I’ll have retrieved the artifacts of Runetek the Fighter, Dvergar the Magician, and Oakraven the Druid.
Time so far: 18 hours
Original URL: http://crpgaddict.blogspot.com/2019/01/black-crypt-something-about-magic.html